LARPING
My Larping Context
It might be helpful for me to briefly give some context about my larping goals. As a 52-year-old man, with little larping experience, who enjoys gadgets and guns, airsoft was an easy hobby to get into but having never been in the military, I had little to no desire to dress up as or pretend to be some sort of military high speed guy. What I found appealing were the plain clothes, low-vis operators of the world who show up in jeans, a flannel shirt under their chest rig or plate carrier, and are topped off with a baseball cap. These were the seasoned guys who had maybe done a couple of tours, knew what to expect, and didn’t care what they looked like as long as they had the right tools for the job. This is me. I’ve been around, don’t care what others think, and want to make sure I have the right tools/gadgets for the event.
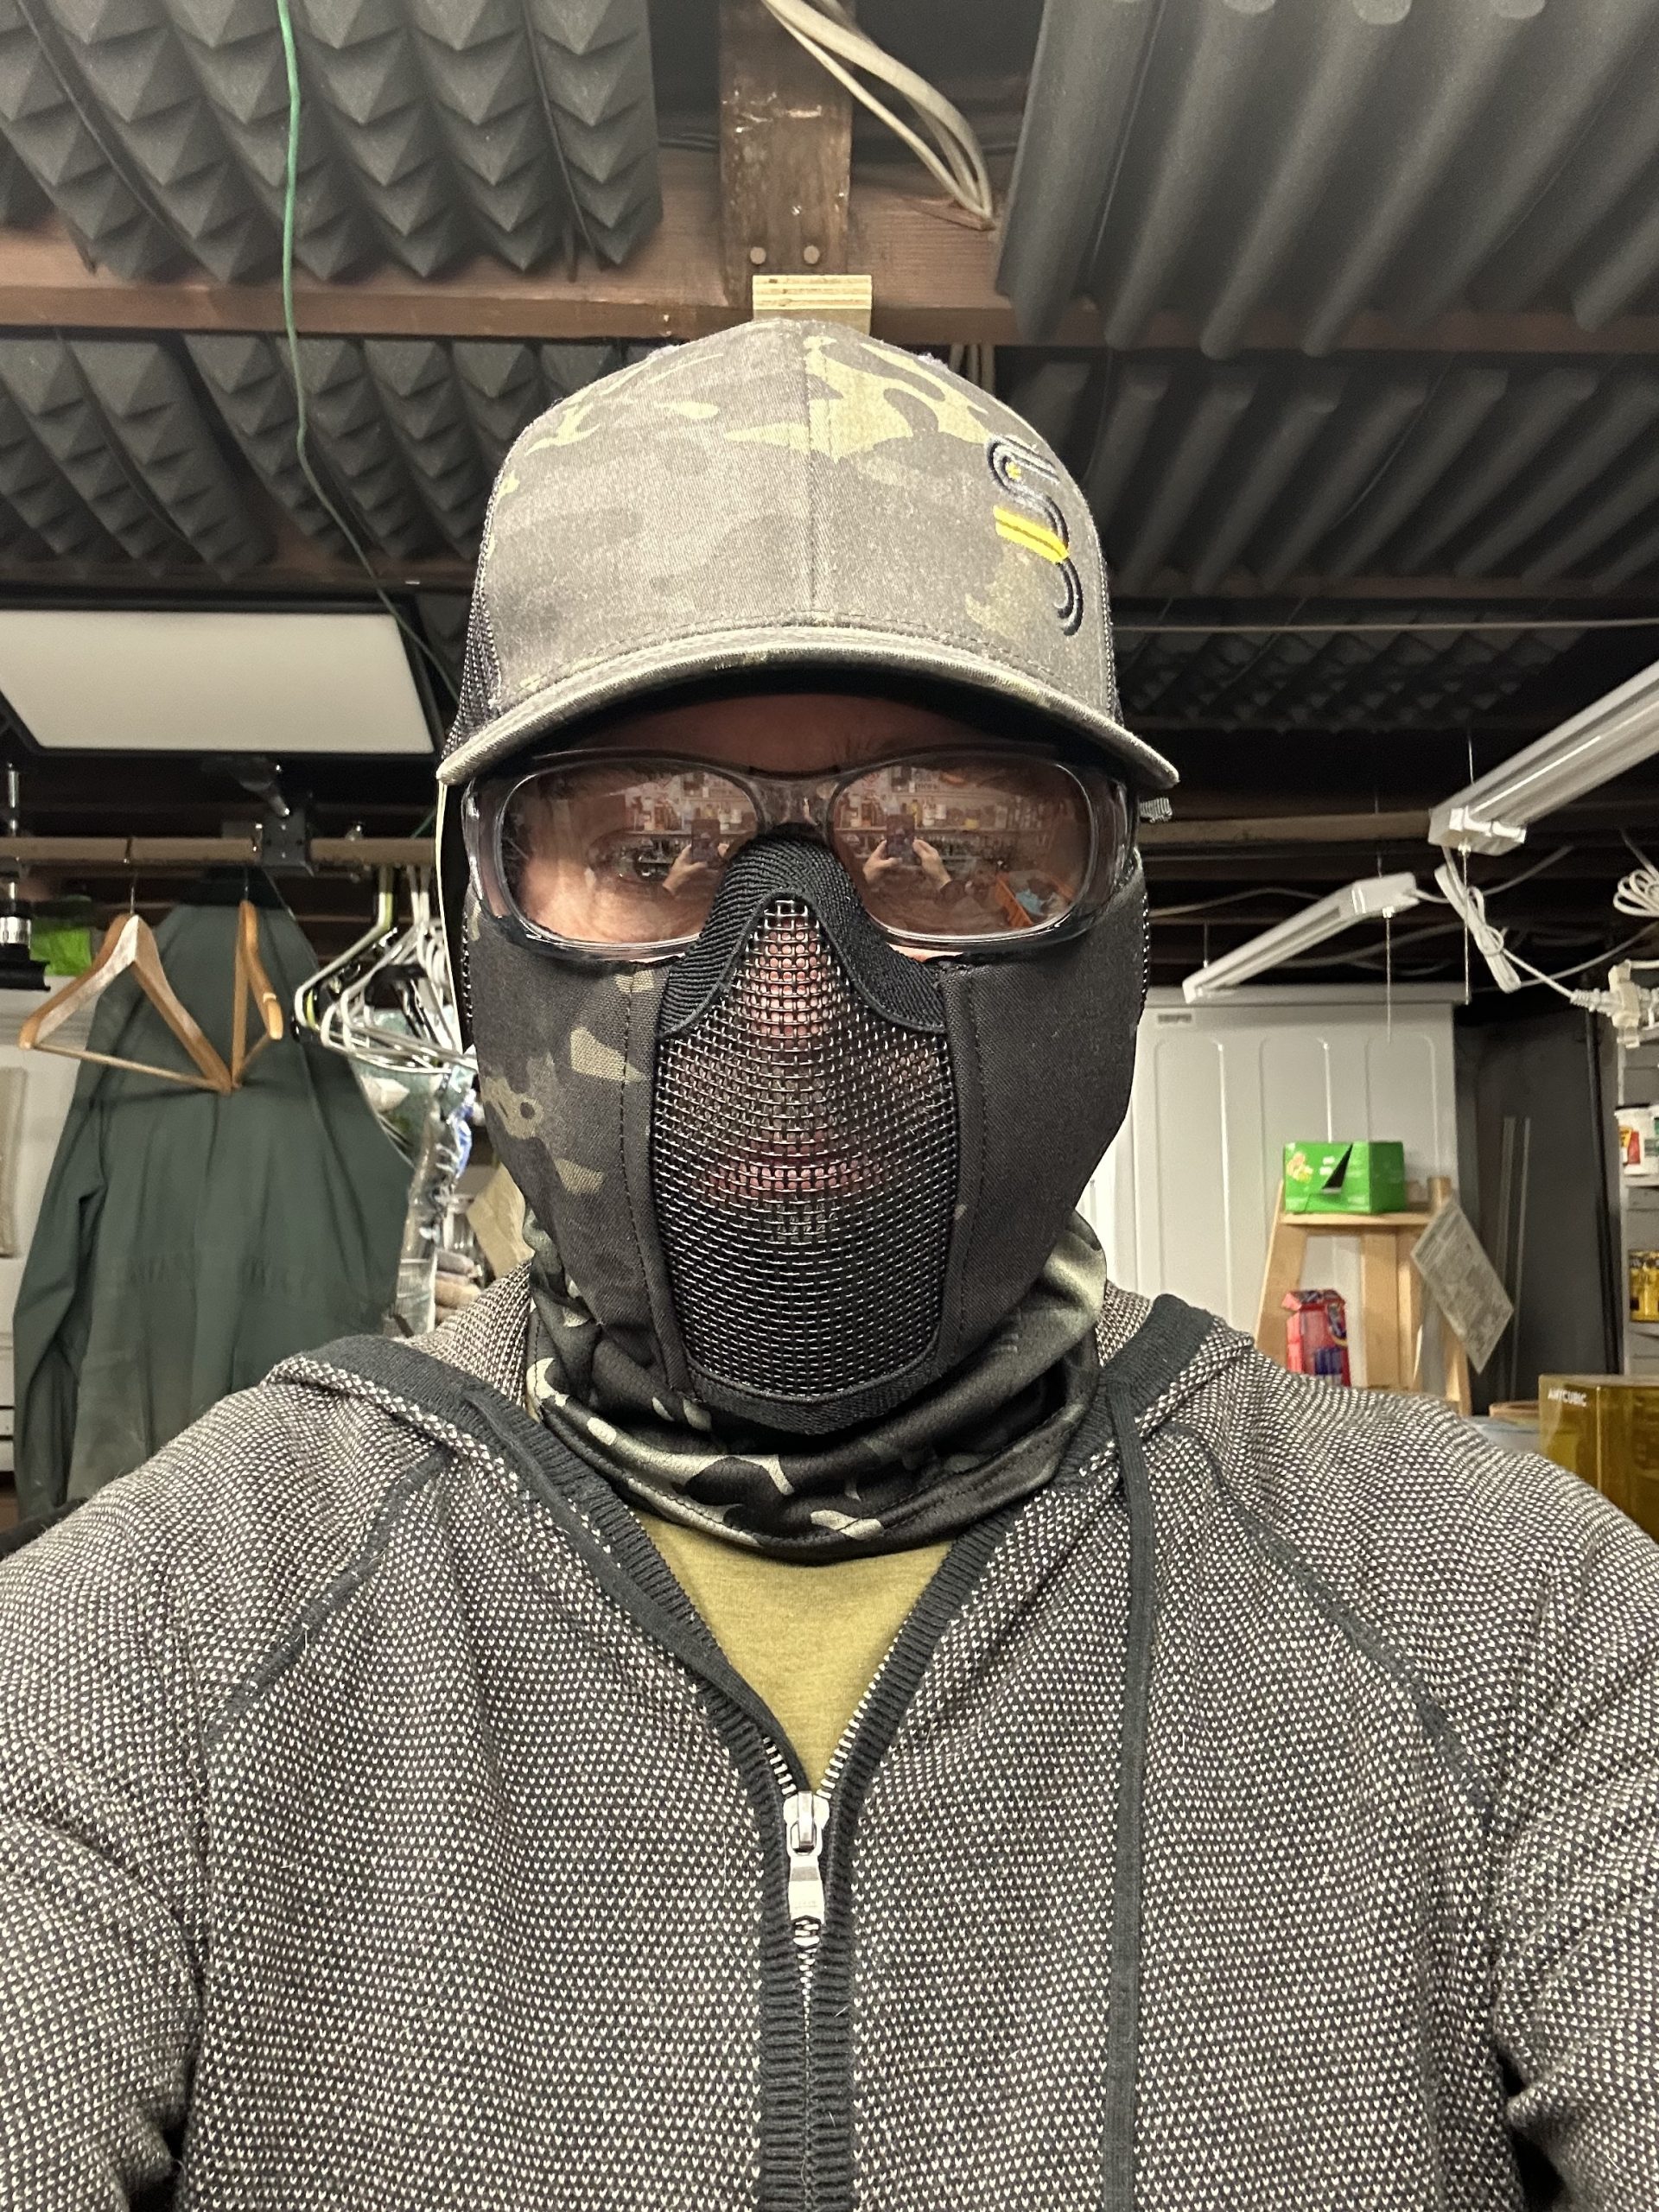
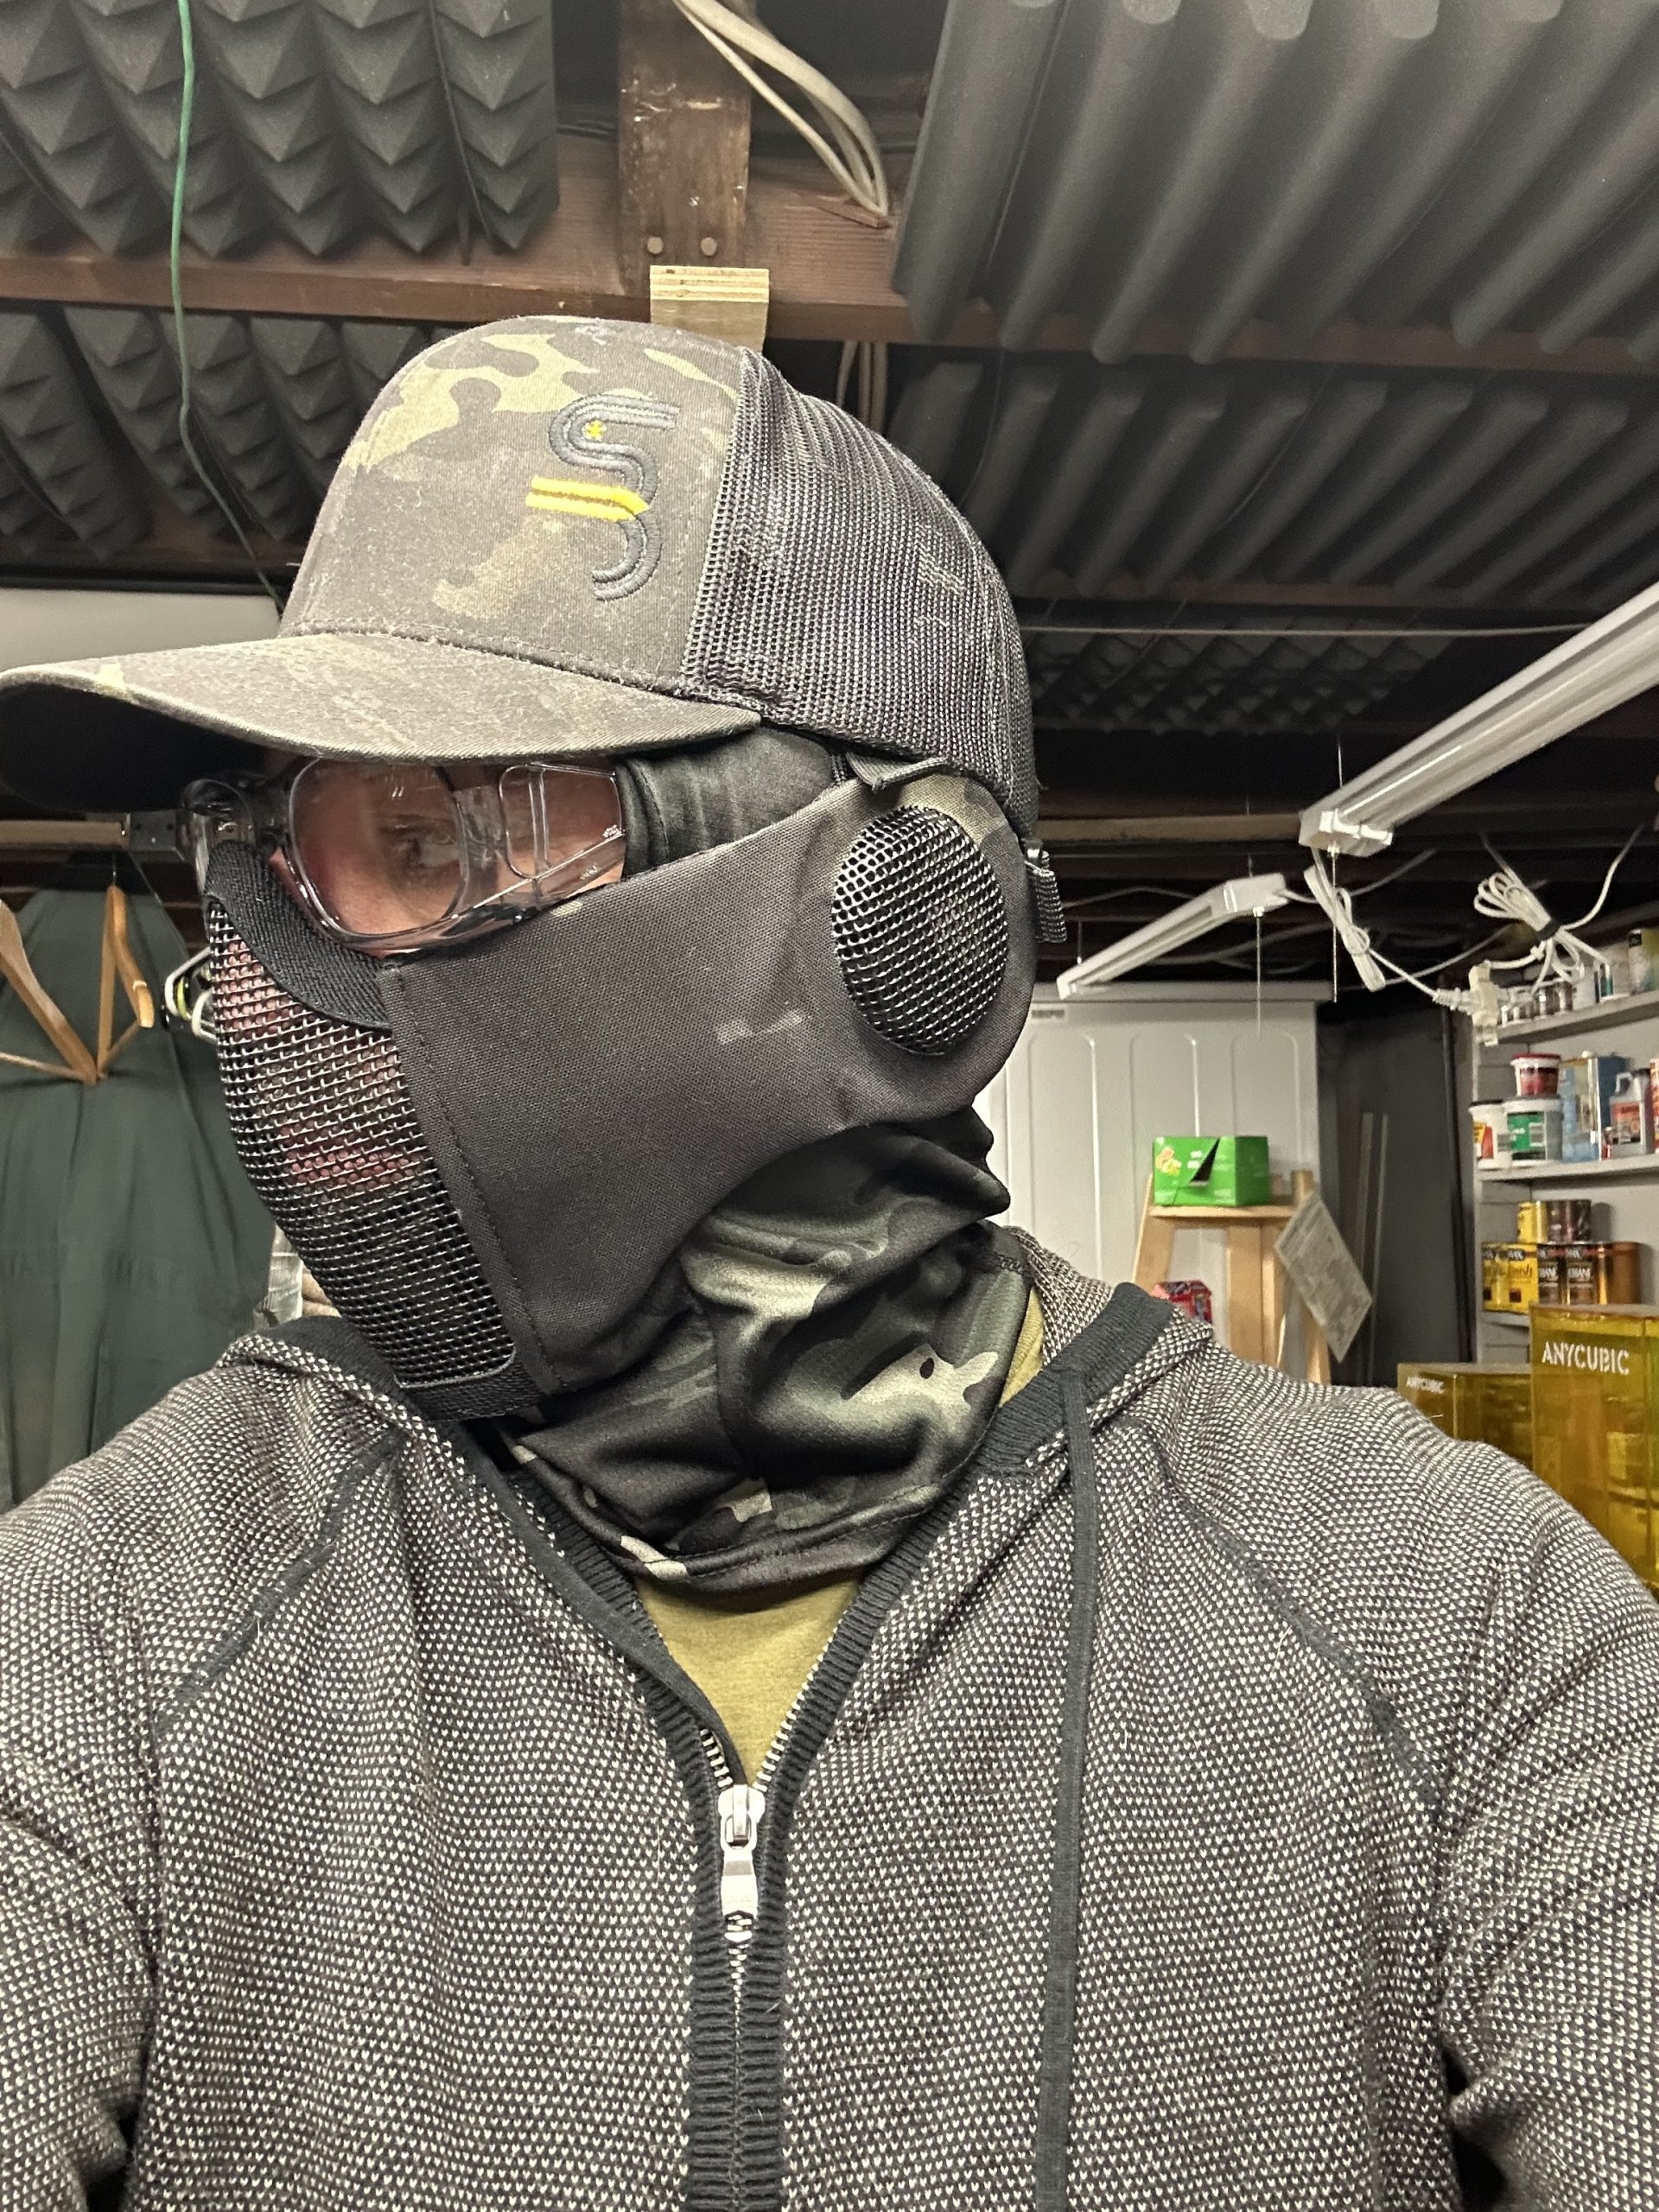
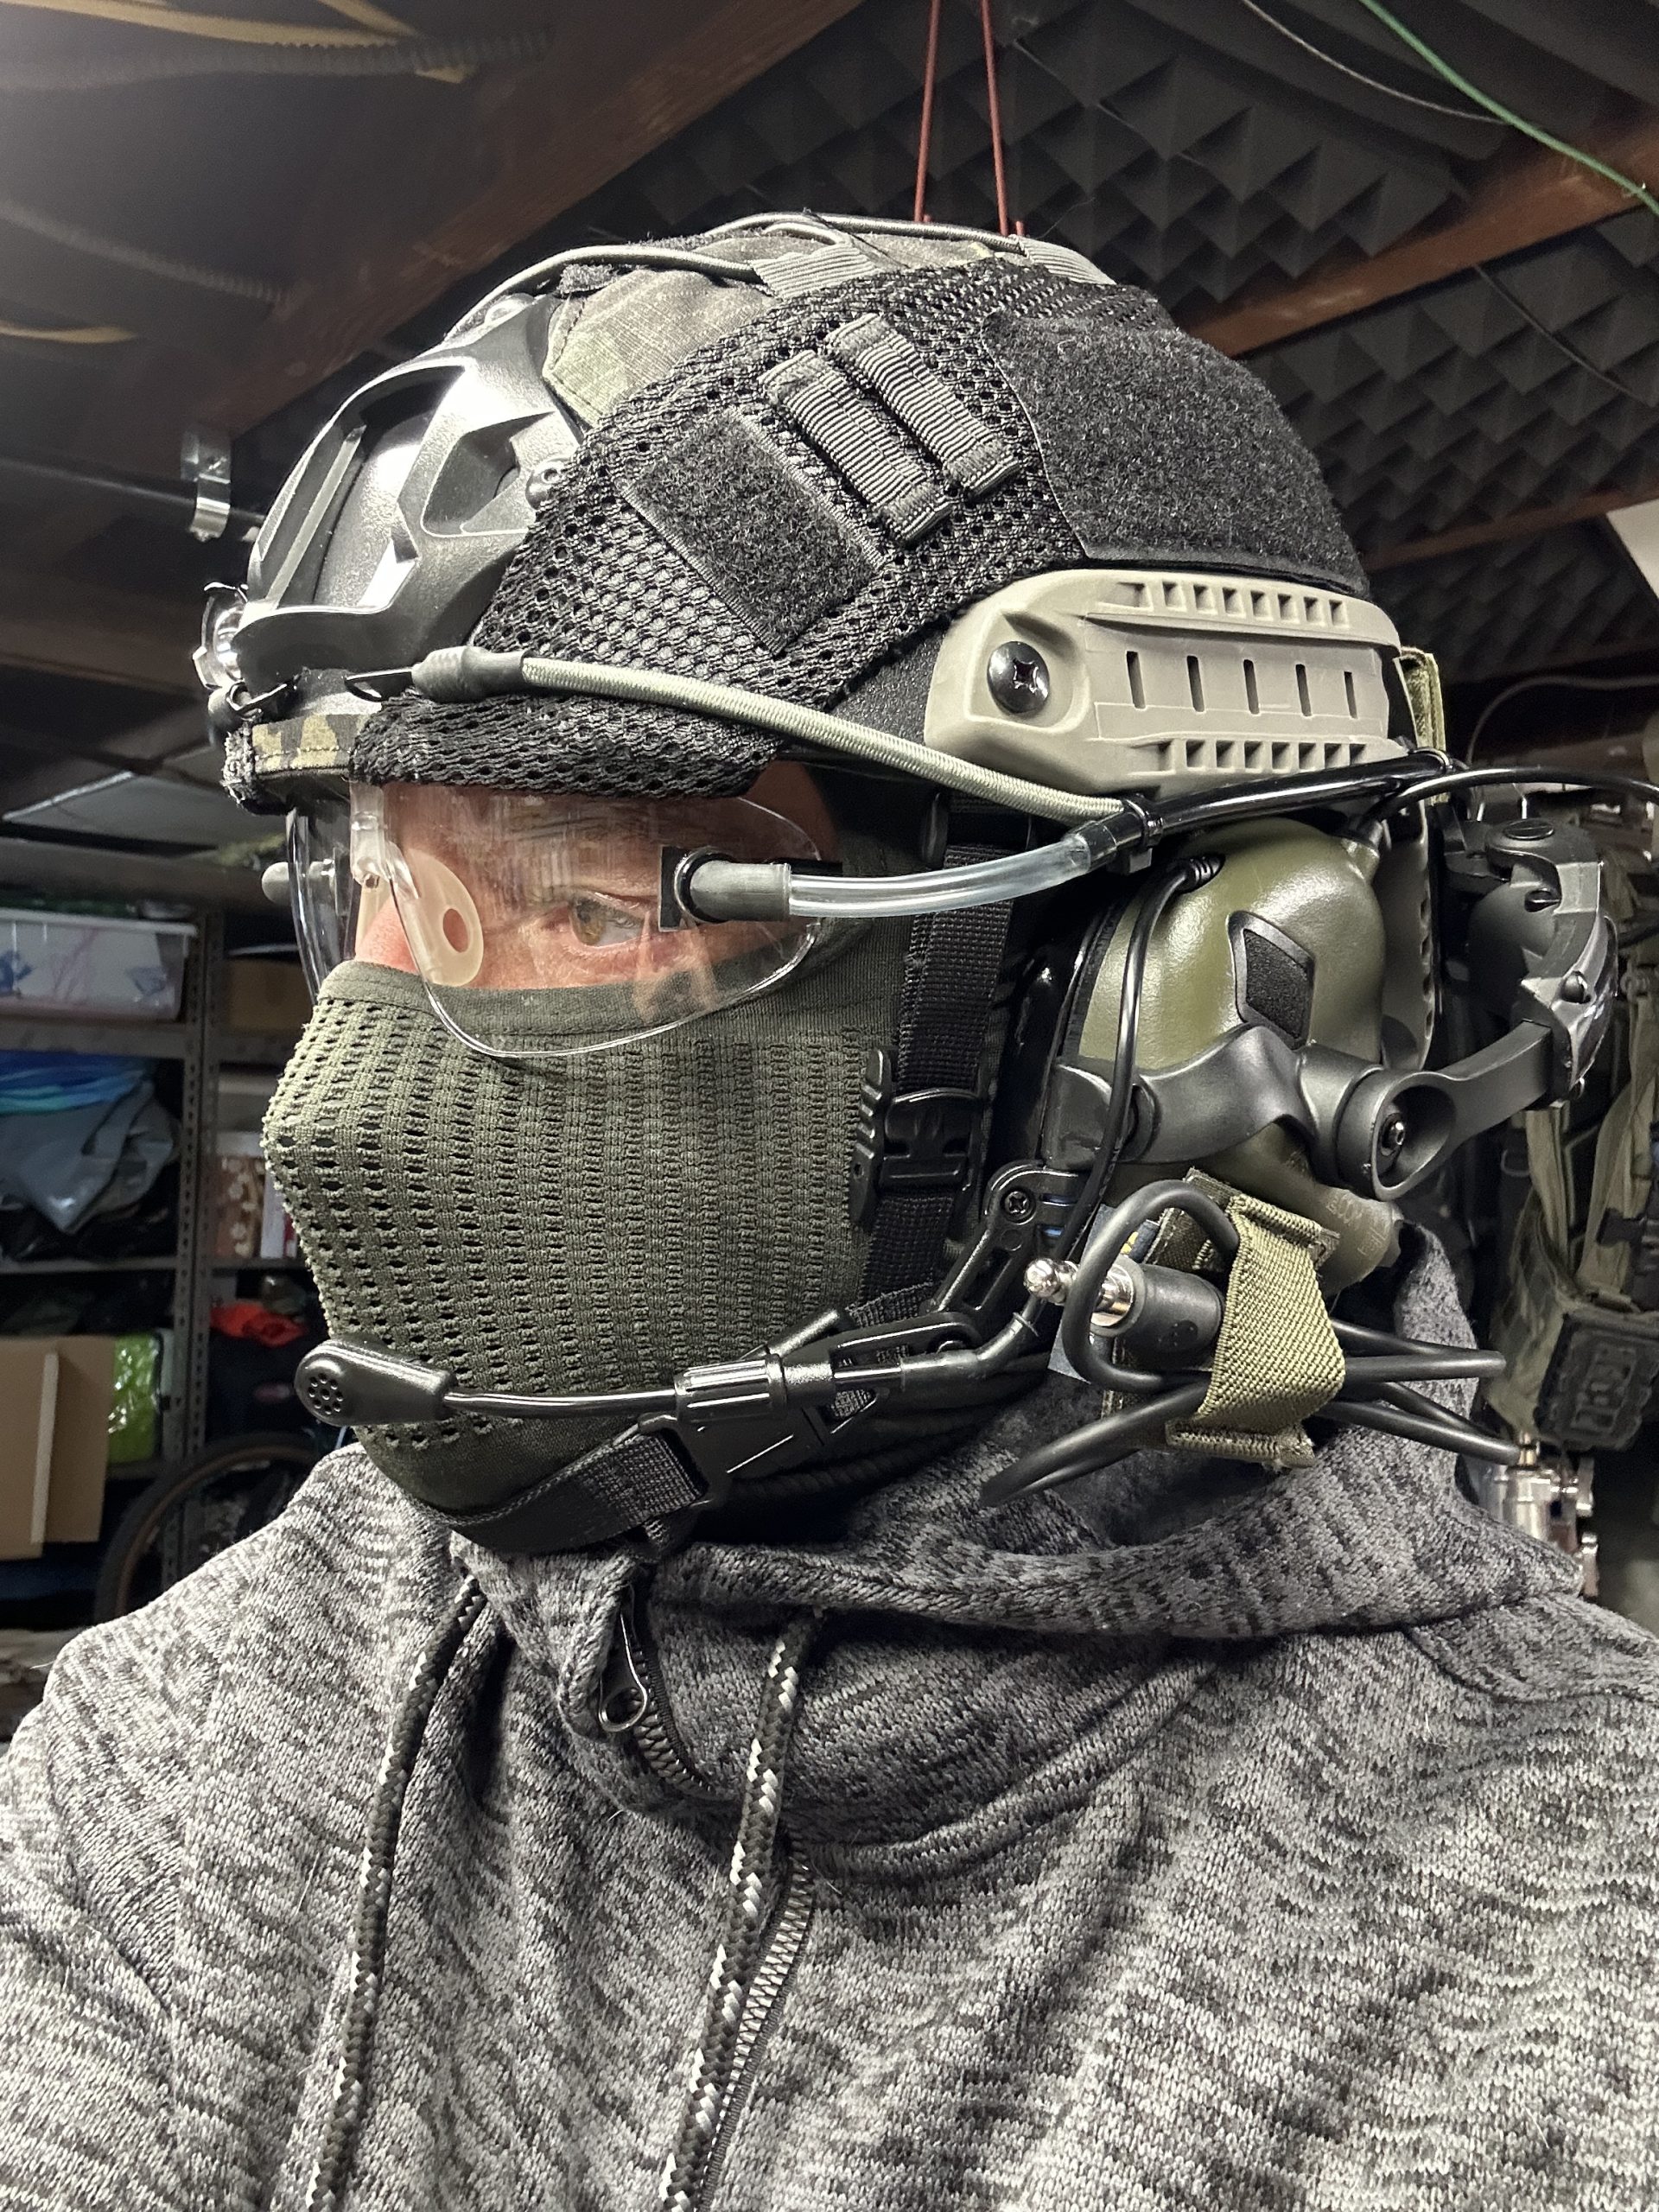
Although the helmet I am about to share is less than low-vis, to be fair, I did start out developing my low-vis kit with a black multicam baseball cap and balaclava which felt good, especially in regards to airflow, however, the overall look of it was less than cool in my opinion. Over time I tried several different face coverings, glasses, hats, etc and each time, although they did their job, there were always little things that didn’t work for me. Fogging, communication with my team, especially over comms with my immediate family/friends who join me at these events, were the biggest issues.
Meanwhile, as more and more friends joined my daughter and me at airsoft events, the more gear I had on hand for them to use, thanks to the Amazon Vine program. And as I continued to develop my own larping look, I began to branch out and use or at least consider using some of the gear I had on hand. One item that I had on hand, which had some potential, was a simple and cheap bump helmet, which was less than comfortable, or secure. For it to work, it needed better padding, a better suspension and chin strap system, better accessory rails… essentially a whole new helmet. Instead of dropping a hundred dollars or more on a new helmet, I was again, with the aid of Amazon Vine, able to source many of these items, over time, which helped me develop the helmet where it is today.
Airflow
The helmet didn’t come together all at once and my decision to use a helmet took even longer but the more helmet accessories that popped up on my Amazon Vine page, the easier it was to consider the bump helmet for airsoft events, even if that meant it wasn’t as low-vis as I wanted it to be.
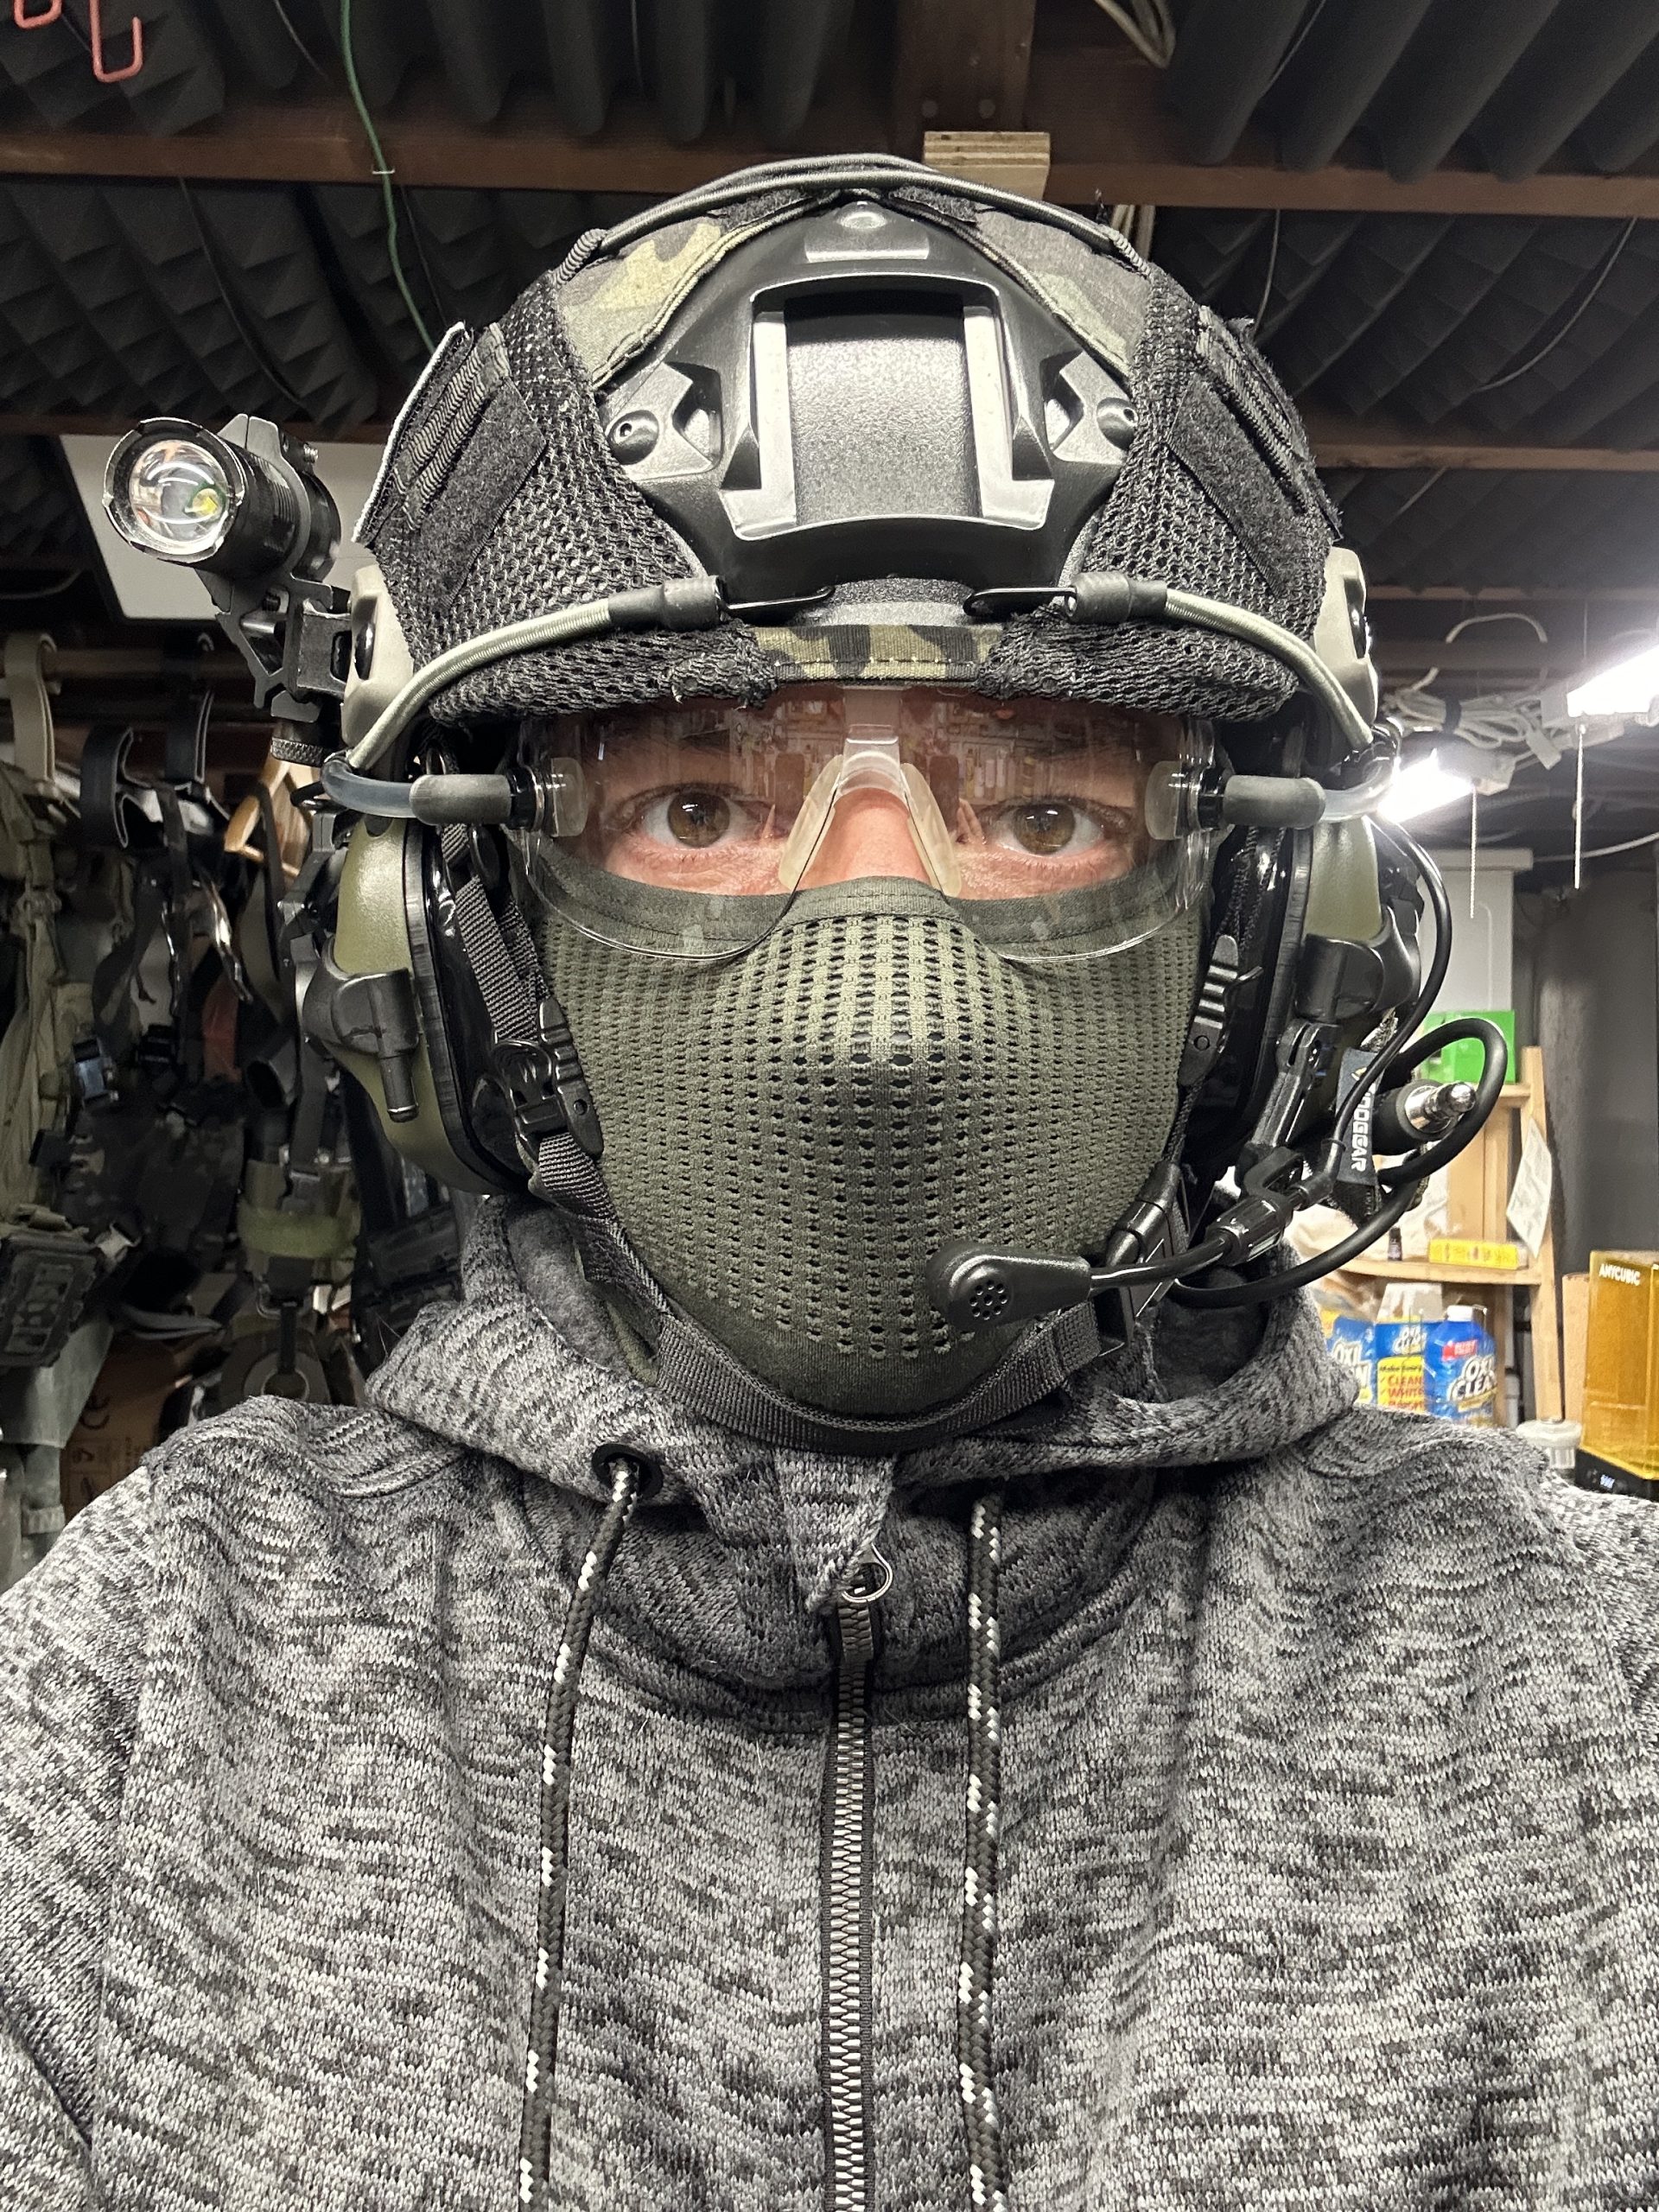
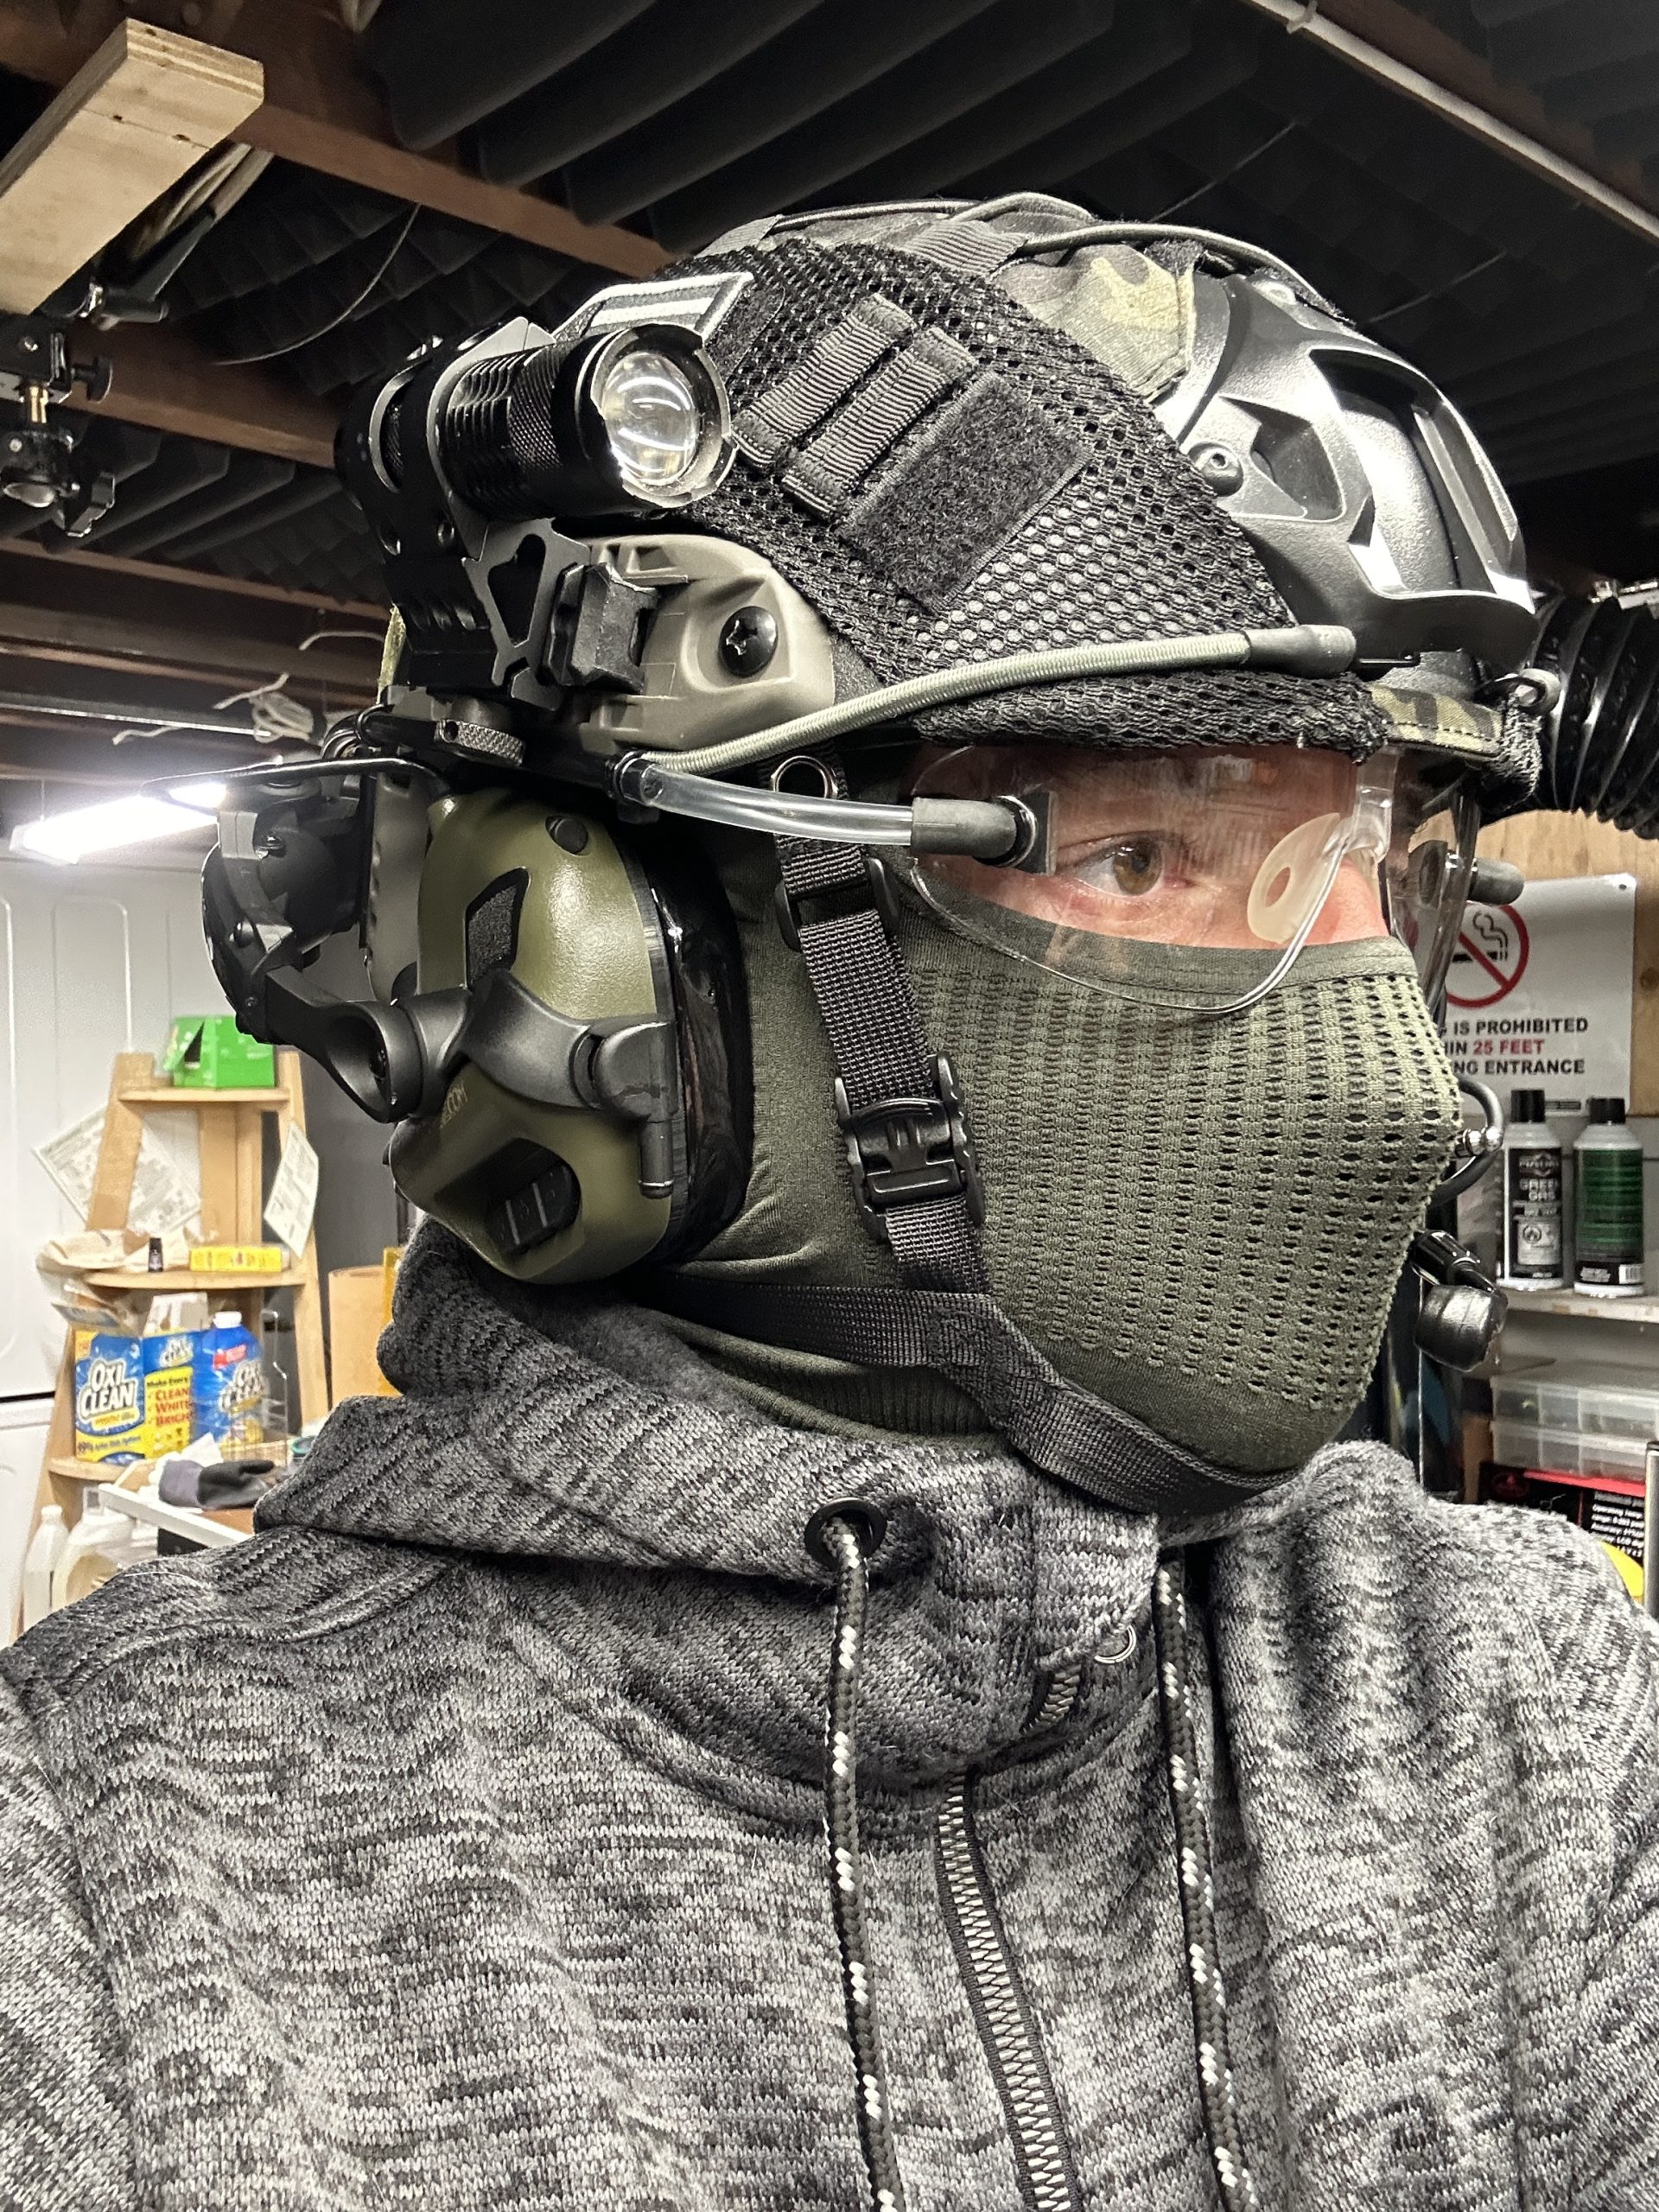
The biggest struggle, at least for me, on the airsoft field is the fogging. I wear prescription glasses and no matter what I tried, fogging was always an issue, especially if I wore my prescription glasses under a pair of goggles. I eventually gave up on wearing prescription classes while participating in airsoft events and leaned more towards a good pair of rated safety glasses. Even then, I needed to be moving to avoid fogging. Enter the ExFog unit. Although this little guy comes with a head strap that can be worn over a baseball cap, the idea of mounting it to a bump helmet seemed much better which was another reason to go down the road of a bump helmet altogether.

I mentioned the ExFog first because I believe its purchase set off a chain reaction to build out this helmet in its entirety. To be clear, the ExFog was not part of the Amazon Vine program; I paid full price for it. If you haven’t seen the ExFog before, it’s a little battery opperated fan unit that you wear on your head or helmet that pumps outside air via tubes to your goggles or glasses to help mitigate fog. Once I invested the $60 to avoid fog in my glasses, I was in it for the long haul.
Like many other things I do, once I am invested, it or the hobby tends to take on a life of its own. The ExFog is meant to be installed quickly with no real tools or customization. Well, that’s just not my way. I wanted the installation to be clean and custom and this would require some tools.


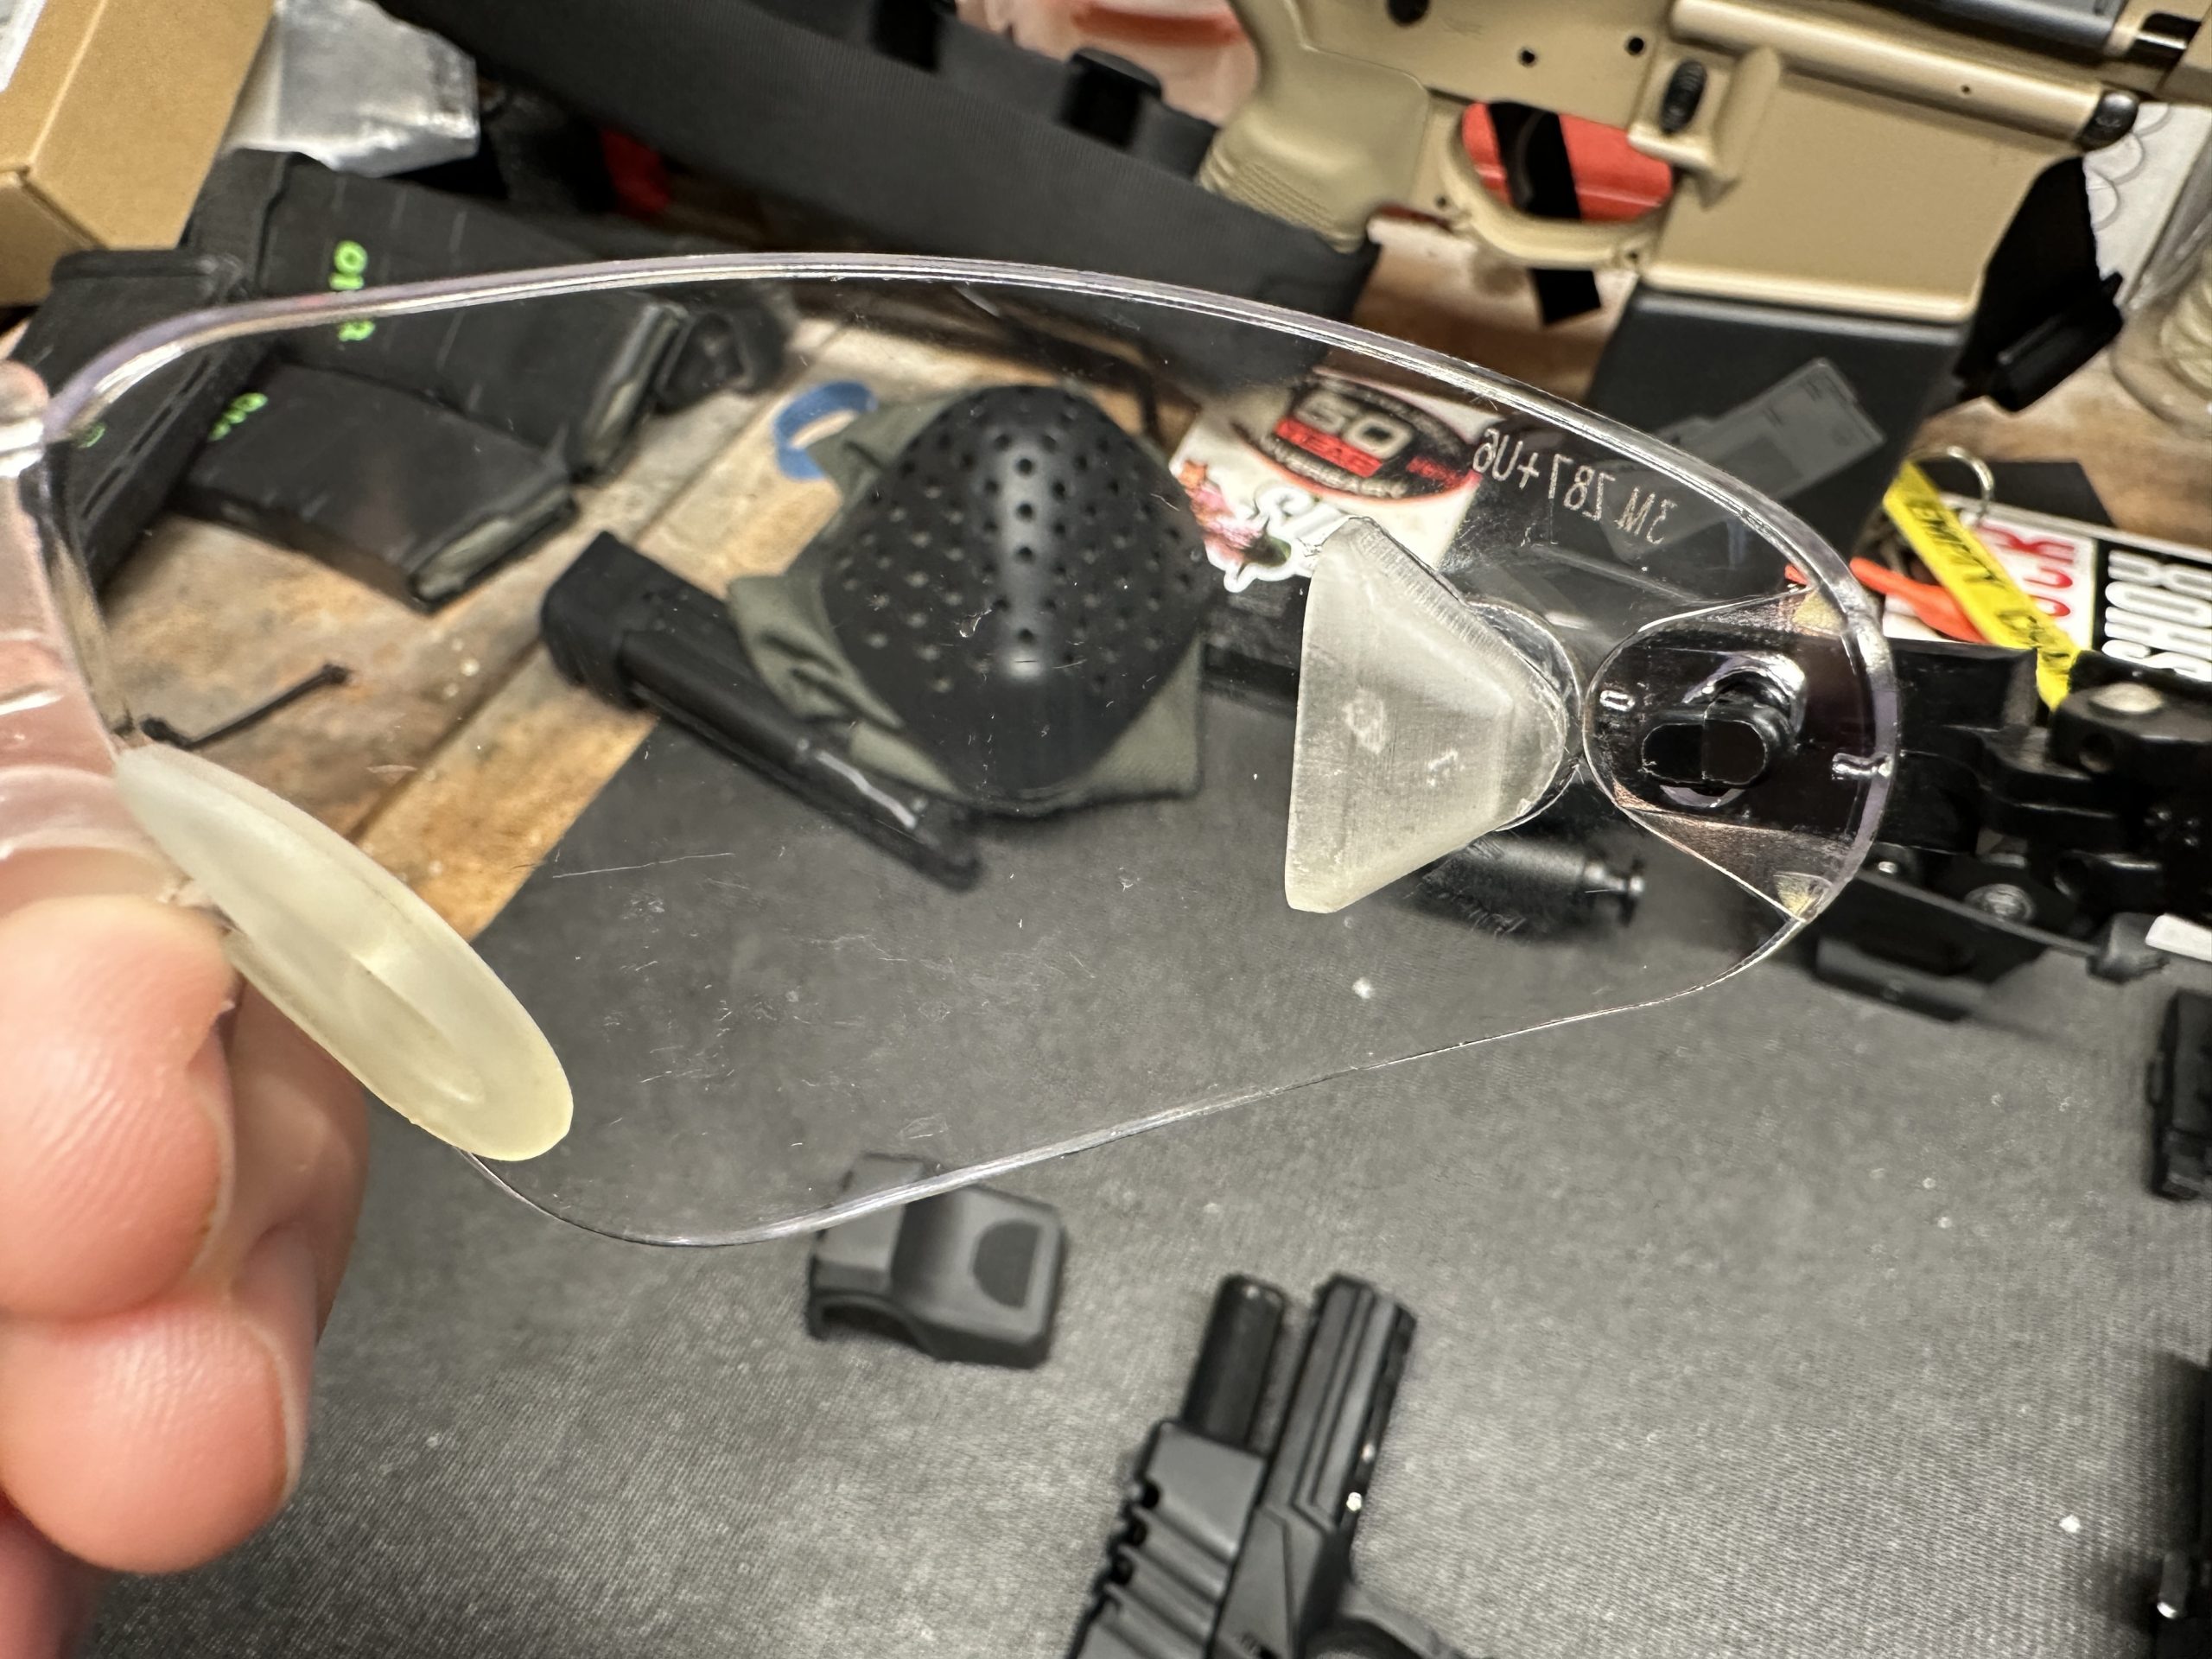

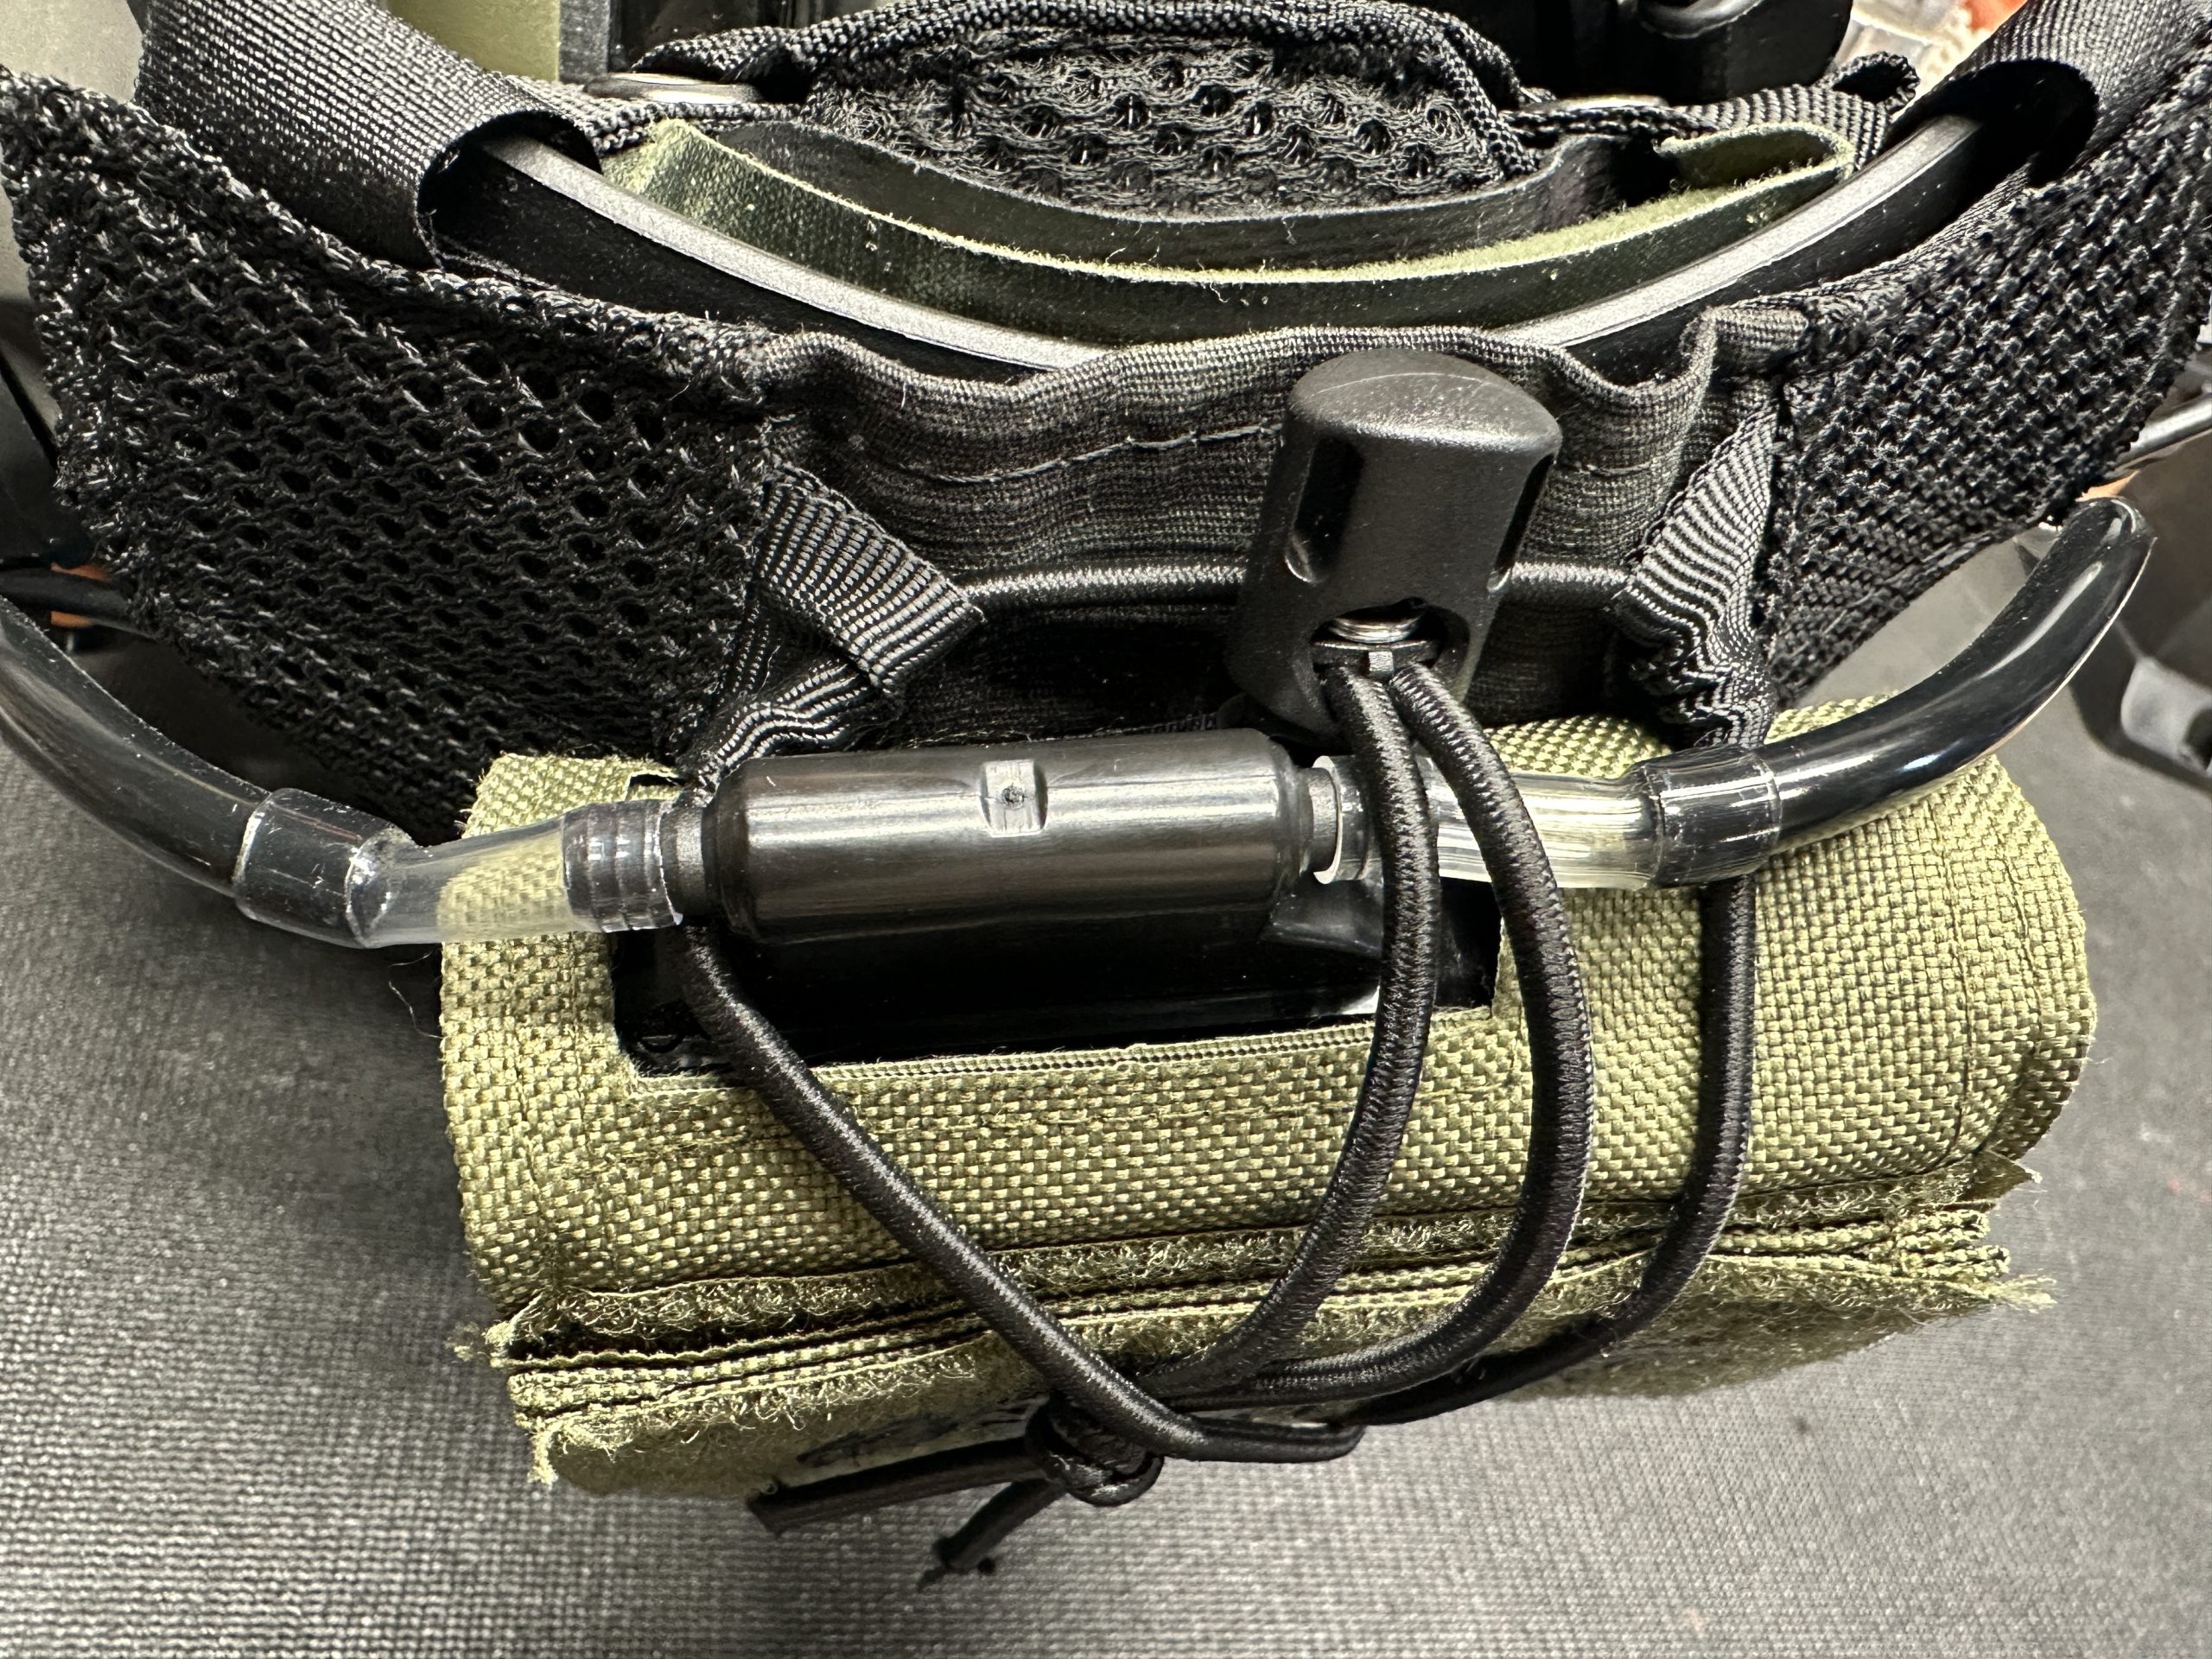
The ExFog comes with some pretty nifty little magnetic hose fittings (1) which inspired me. Initially, after drilling holes in the sides of my safety glasses, I mounted these fittings up but found that since the fittings on the outside don’t have an elbow, the hose awkwardly sticks out of the side of my glasses. To solve this, I created and 3D printed two elbows (2) to help mitigate this issue. The elbows were married to the ExFog magnetic fitting that came with the kit. And although the kit comes with two little inner elbows to help direct the air towards your lenses, I found that they didn’t do the best job for me, never mind how close they were to my eyeball, so I decided to create a custom diverter (3) to help get the air to flow over and along the surface of the lens. I printed this diverter using clear resin hoping it wouldn’t stand out so much, however, I ended up using black double sided tape to mount it so ultimately it isn’t so transparent (4 &5).
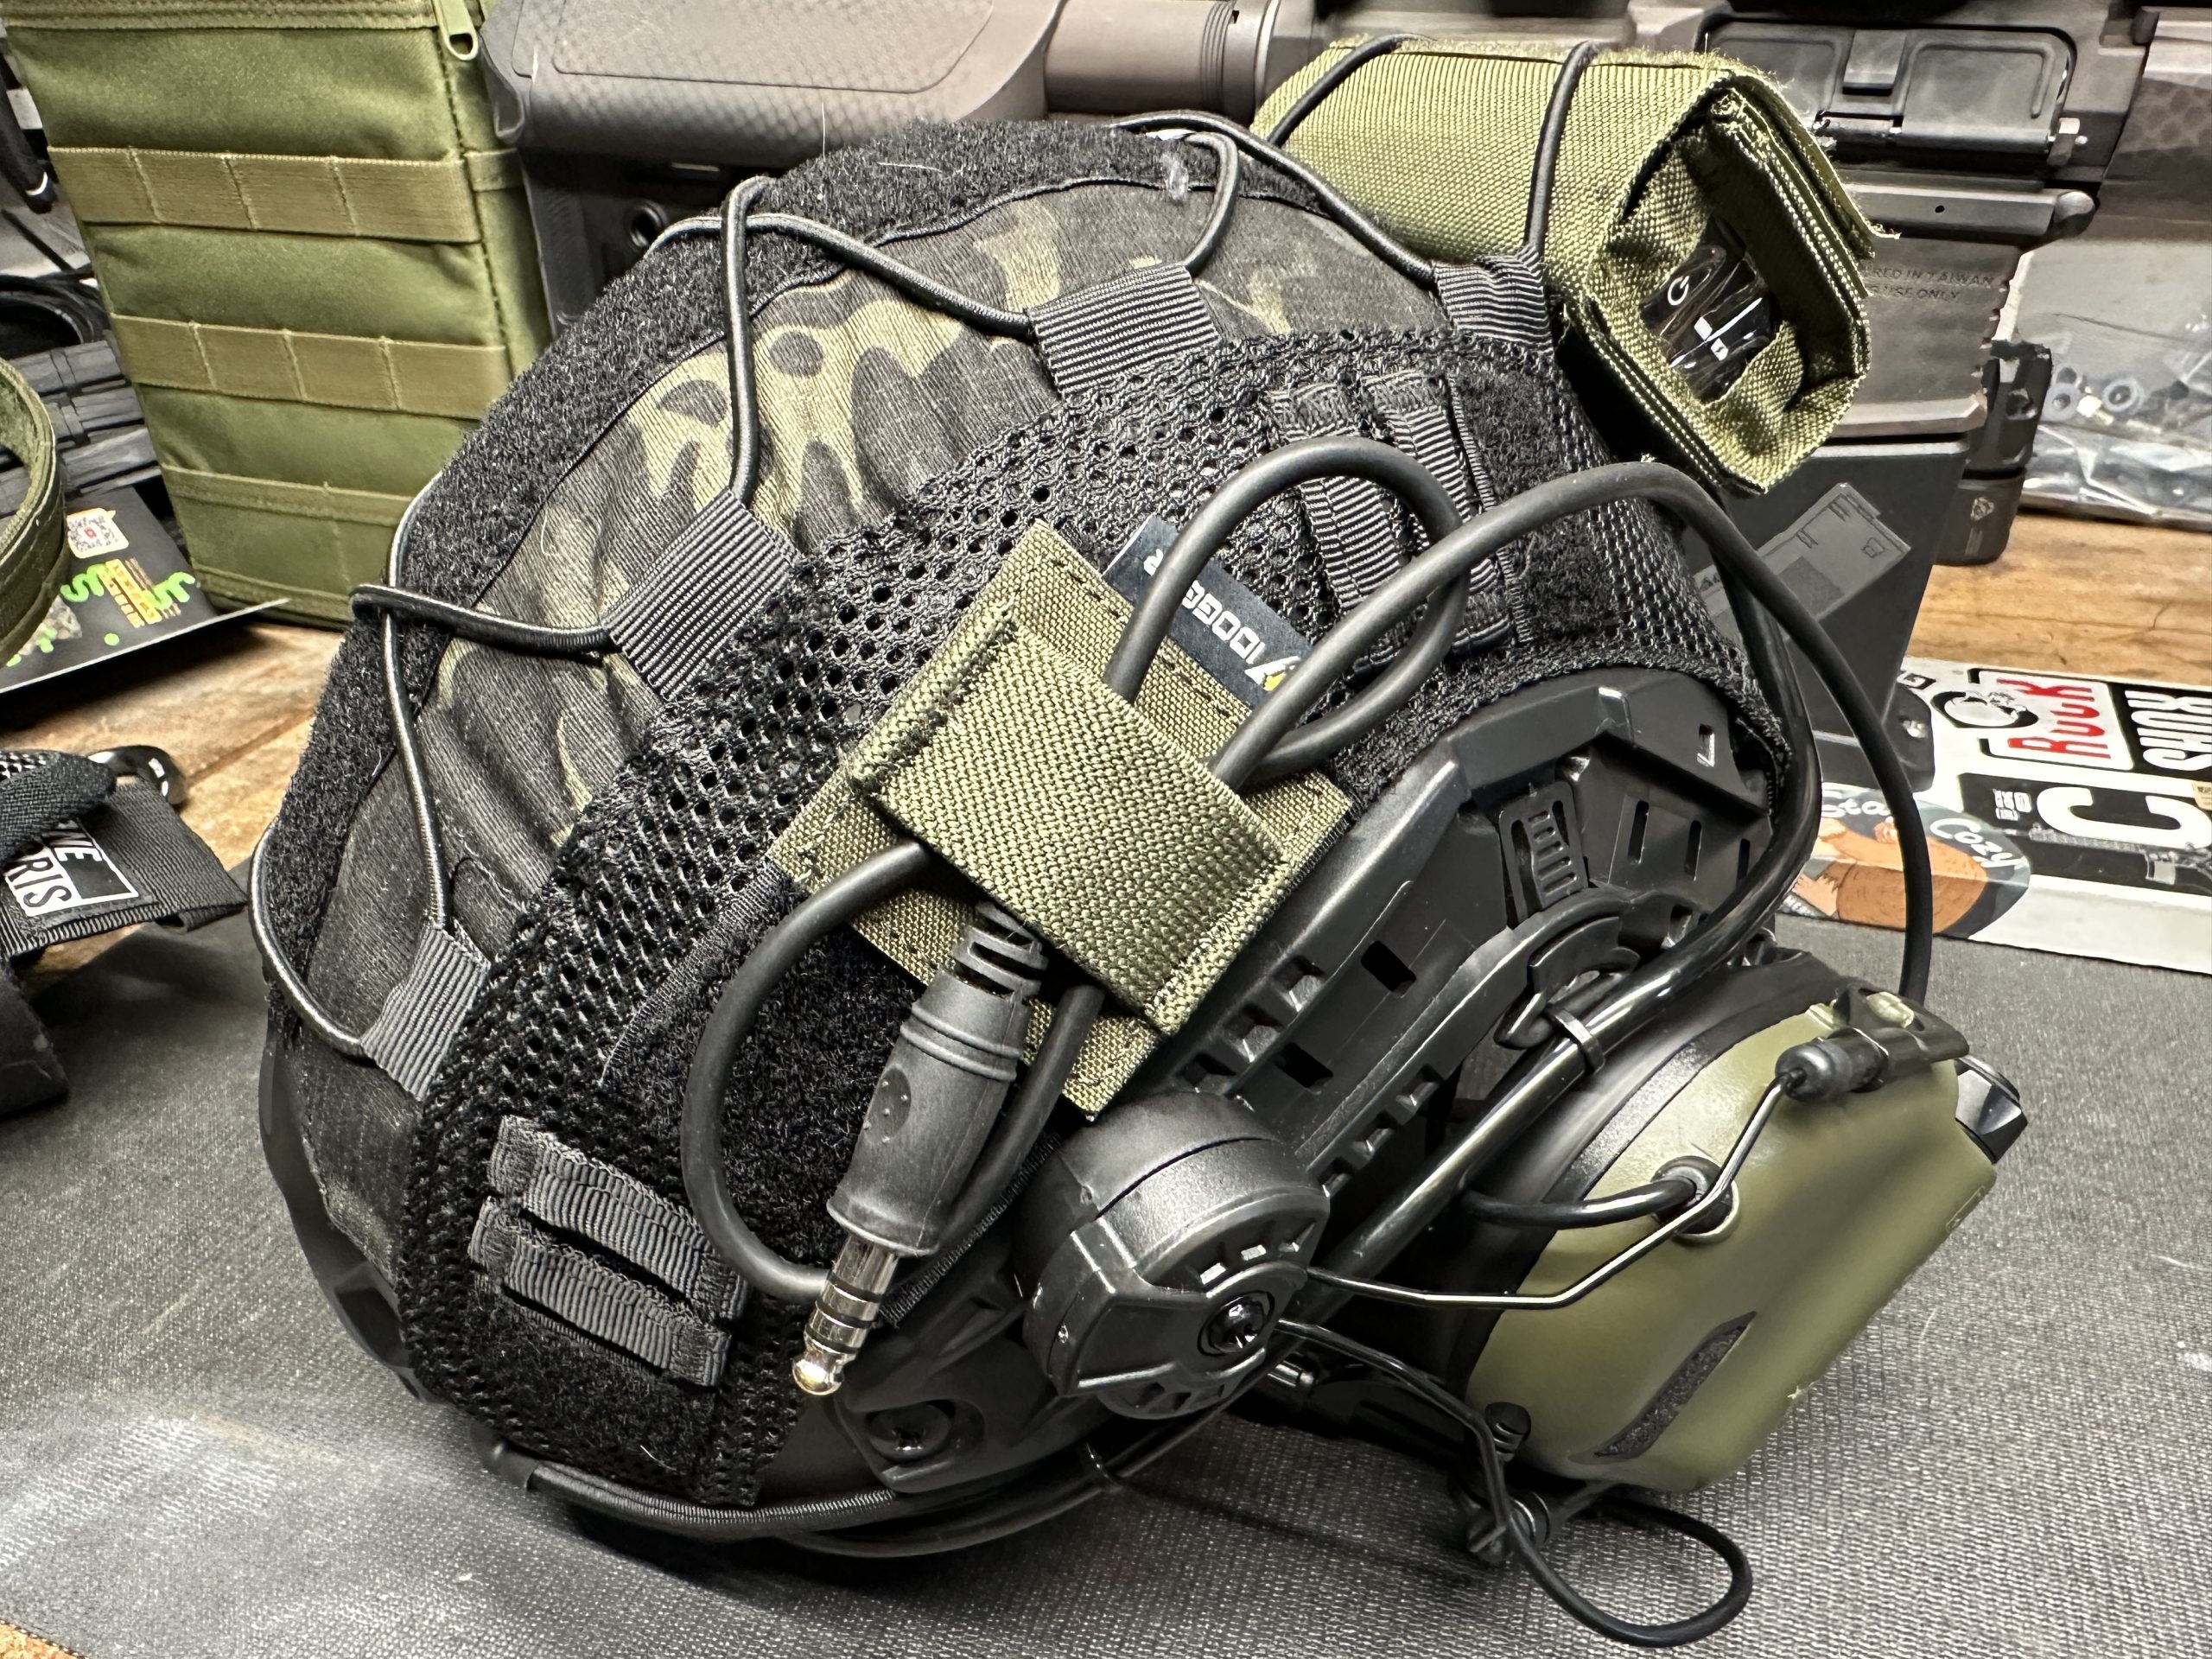
On the outside of the lens of the glasses, I glued a stainless steel washer (5) that became the mounting spot for the magnetic elbow which then attaches to the hose that then routes back to the ExFog (6).
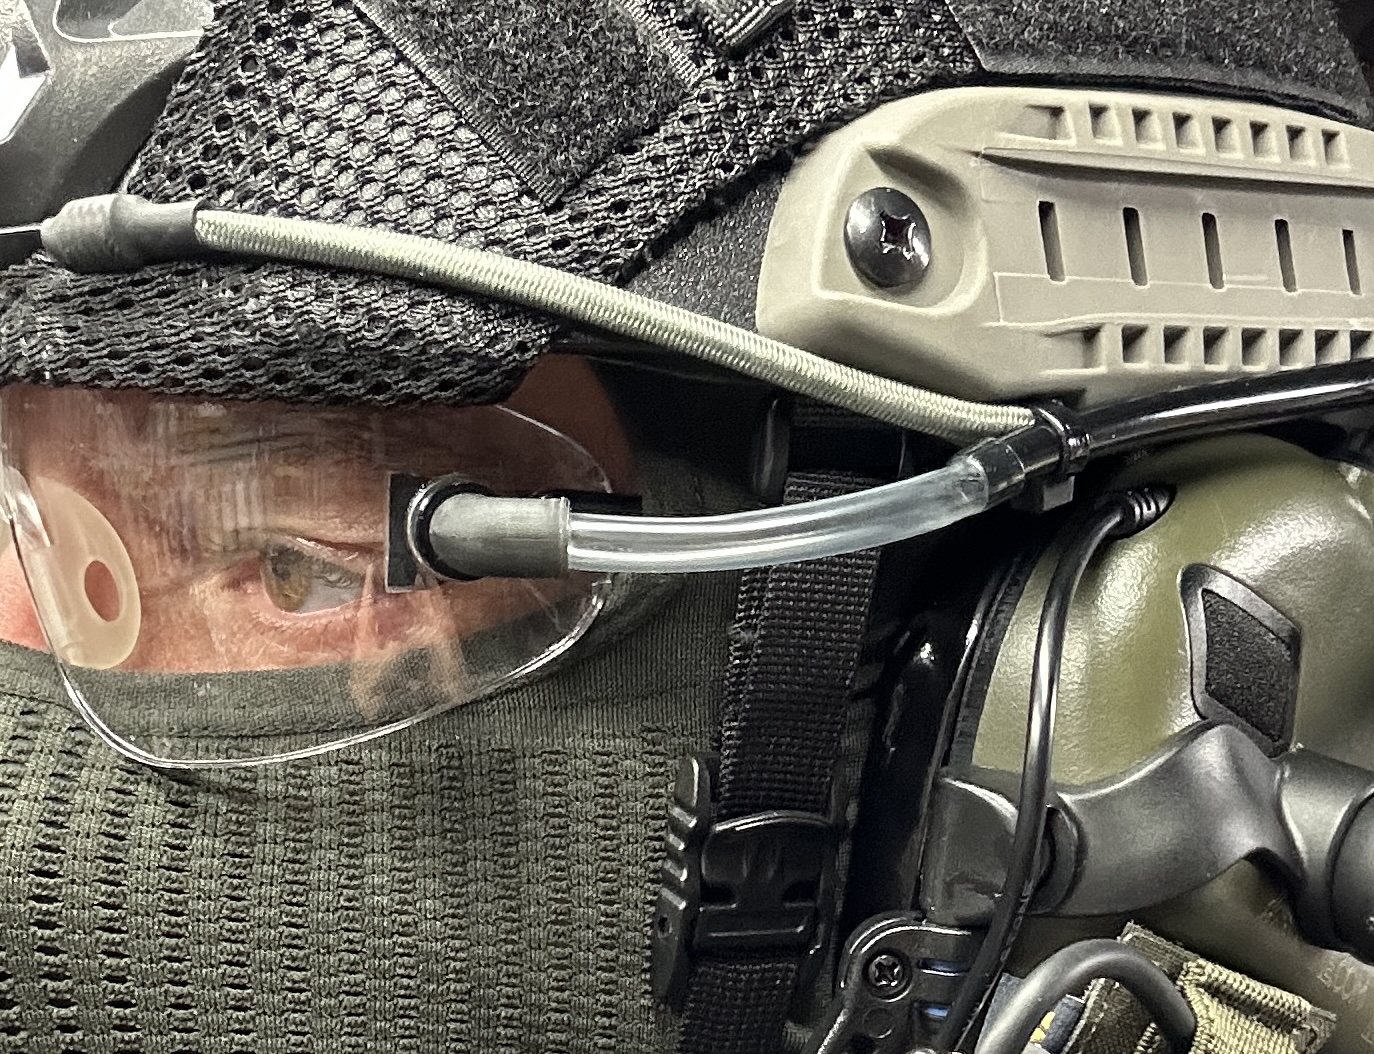
Speaking of routing, instead of using the clear rubber hose the entire way back to the ExFog, I used a more rigid airline hose, which I heated and shaped, creating the necessary bends to follow the line of the helmet and turn towards the ExFog. At each end of the hose, I used the more flexible clear plastic hose to make the connections. My plan is to eventually swap out a black flexible hose for the clear version. In an attempt to better hide the hose, I did try to route the hose inside the helmet as well as under the helmet cover but in the end, the final routing location best suited the connection at the glasses.
Comms
Once the fogging problem had been more or less solved, I moved on to communication. My daughter and I like to talk while in battle, not so much for tactical maneuvers, although that does happen from time to time, mostly just to know where the other is. We are always on the same team but often I’m more aggressive than she is and find myself up on the front lines while she’s supporting from further back. I use comms as a way to encourage her to push up and join her old man in the pits of hell as I take on enemy fire. I mean, who wouldn’t want to join, right?
Up until building the bump helmet, we had been using Beofang radios with decent speaker microphones mounted to the shoulder straps of our plate carriers but like anything else, those speaker microphones have their place and their place is not the airsoft battlefield. You don’t want to turn the volume up loud enough to hear the communication in all situations because it could potentially give your position away and you can’t turn it down enough to avoid giving your position away because you can’t hear what the other person is saying. So, of course, the next step is headphones of some kind. Similar to the ExFog, the headphones, unfortunately, were not part of Amazon Vine, so I ended up purchasing my own pair. Fortunately, I had some store credit and some coupons so I was able to get a decent pair for cheap.
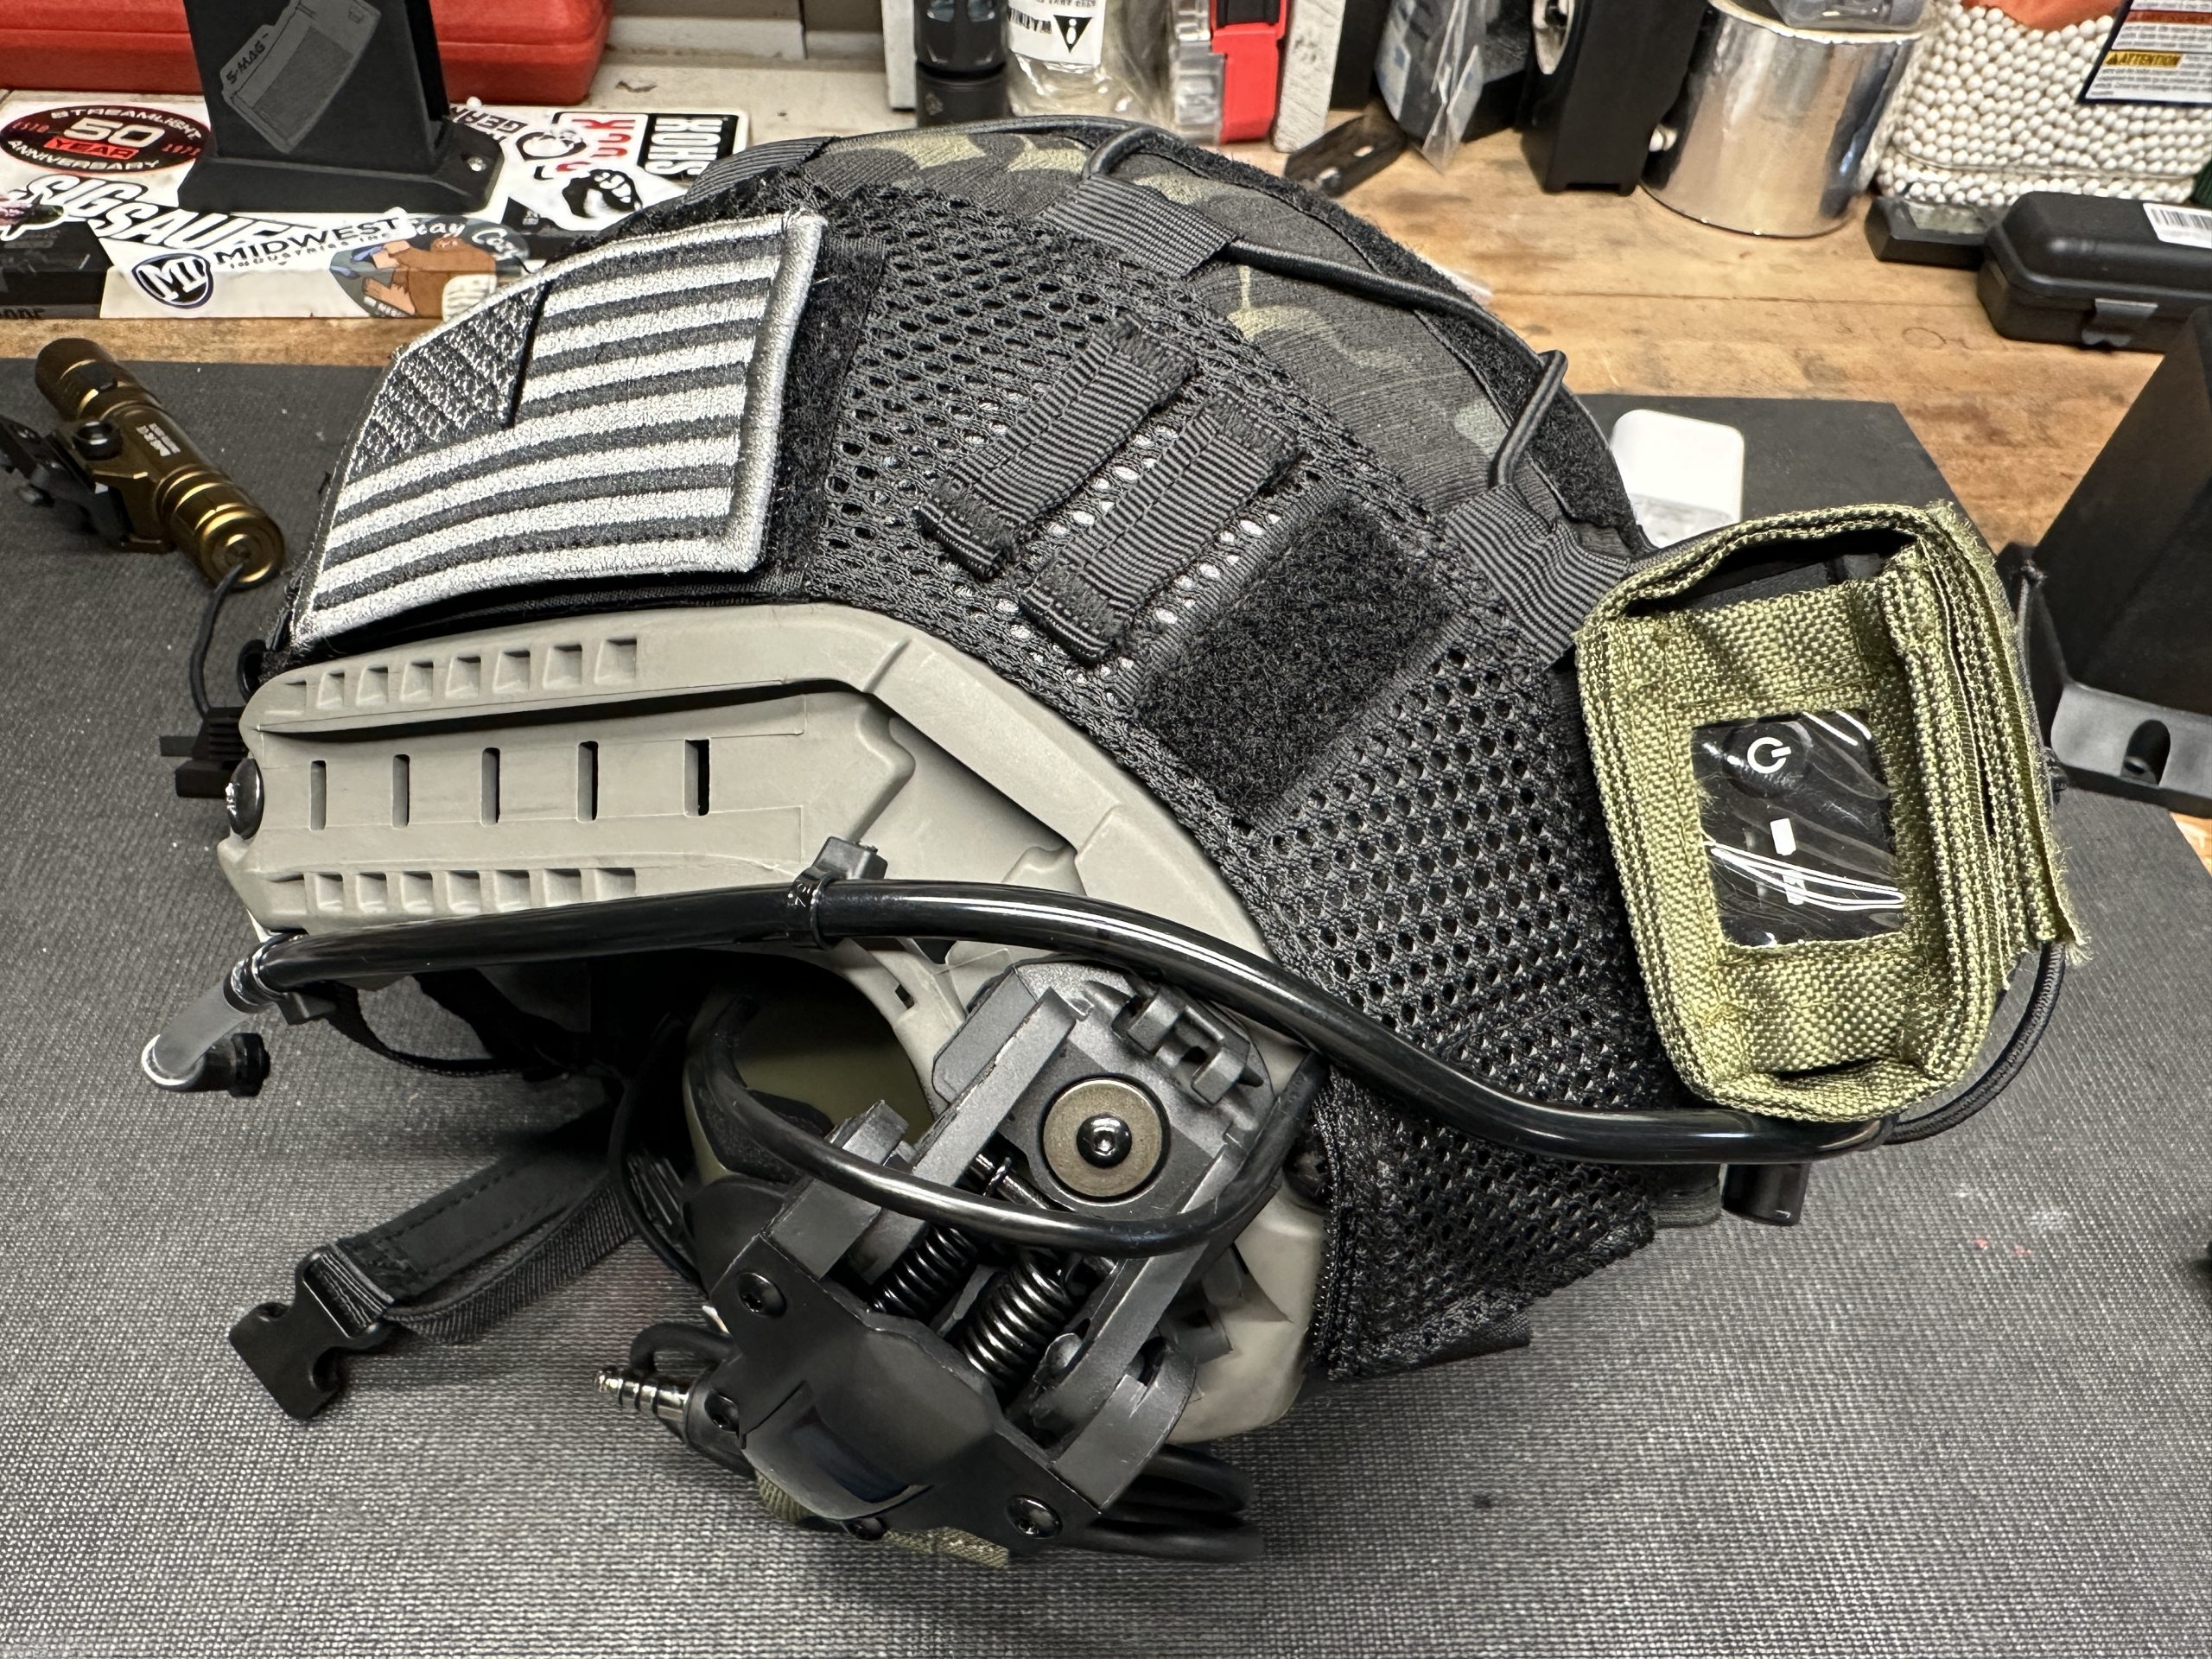
Better or newer gear often highlights the deficiencies of older or cheaper gear. In this case, the headphone brackets would not stay connected to the accessory rails of the cheap bump helmet. Eventually, I was able to source a new pair of accessory rails from Amazon Vine.
Now with a decent set of headphones mounted to the bump helmet, it was starting to look like something I would want to use. I wouldn’t have to deal with fogging and I could finally hear what others were saying.
Other Accessories
At this point in the helmet’s development, it’s still not being used for its intended purpose. I was still a big proponent of the low-vis look but I was getting more and more excited about this helmet setup and its potential. Before I could debut the helmet, however, it needed to fit better, be better secured, and look the part. Below I quickly cover the list of accessories but don’t go into detail or review each product. Suffice it to say, they are all working as intended with no real complaints.
Note: the following accessories were sent to me through the Amazon Vine’s program unless noted otherwise.
The helmet I received did not have good padding. When looking at the Amazon link for this same helmet, it would appear they’ve improved their padding since then but just the same, this is the set of helmet padding I received from Amazon Vine that I’ve been using. Next was the helmet suspension. For that, I received this helmet suspension which, of course, is no longer available but similar products are easily found on Amazon. Next was the helmet cover. I didn’t put much thought into which camo I needed because I knew what I wanted whether or not it was the correct camo. I went with the black multicam helmet cover because I liked the look and knew I would be dawning a mostly green kit. Something else that popped up on Amazon Vine that I didn’t know I needed was this simple cable management patch to help keep the comms cable out of the way when not in use. And again, since the helmet was pretty cheap, I ended up replacing the NVG mount with this aluminum NVG mount compliments of, you guessed it, Amazon Vine. The last accessory I added was this NVG bracket and although I have a single tube night/thermal device, I do not have the proper adapter to connect it to the bracket. So for now, the bracket is all show and no go.
I also have a miscellaneous flashlight attached to the right side accessory rail using some pieces and parts I had lying around. It’s not noteworthy at all but you will notice it in a couple of photos.
So that’s my larping helmet. The only real piece that might be a stand-out versus other bump helmets is my custom tube routing and air diffuser anti-fog setup. If you have any questions on that setup or anything else, don’t hesitate to reach out. And in case you are wondering, I’m running this balaclava (no longer available) with the rubber protective mask from this mask setup.
Part II in the series will highlight my one and only gas blowback rifle and all of its accessories. Stay tuned.